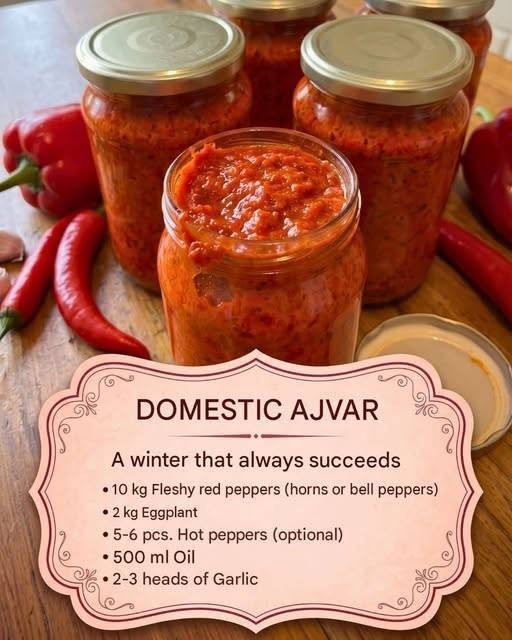
The Ultimate Authentic Ajvar Recipe: How to Make Rich, Smoky Balkan Roasted Pepper Spread at Home
There is a distinct, mesmerizing aroma that takes over Balkan kitchens every autumn: red bell peppers roasting over open flames, charring just enough to release their natural sugars into the cool air. That ritual is the birth of ajvar—a legendary roasted red pepper and eggplant spread that has been a culinary anchor across southeastern Europe for generations.
If you have ever purchased a jar of imported ajvar from a specialty European market, you know it is liquid gold. Spread it on a piece of crusty rustic bread, dollop it next to grilled ćevapi, or use it as a vibrant canvas for eggs, and you understand why families spend entire weekends making batches large enough to last the winter.
Yet, store-bought jars often compromise. They dilute the rich flavor with cheap tomato pastes, starches, or artificial preservatives to cut costs. Making traditional homemade ajvar requires patience, but the process is remarkably straightforward. You do not need a commercial smoker or industrial equipment; just quality peppers, patience, and an open flame or a hot oven.
Understanding the Anatomy of True Ajvar
True ajvar is a masterclass in minimalism. At its absolute core, authentic Macedonian and Serbian ajvar features just a few ingredients: sweet red bell peppers (traditionally varieties like Kurtovska Kapija), a touch of eggplant for body and creaminess, garlic, sunflower oil, and salt.
Unlike salsa, which relies on raw freshness, or tomato sauce, which depends on acidity, ajvar is built on deep caramelization. The peppers and eggplants are charred until the skins are completely blackened, trapping steam inside the flesh so the skins slide off effortlessly. The pulp is then slow-cooked—sometimes for hours—in high-quality neutral oil until the moisture evaporates and the mixture concentrates into a luxurious, jam-like spread.
Why Making Ajvar at Home Actually Matters
In the modern culinary landscape, shortcuts are everywhere. Supermarket shelves are lined with mass-produced pepper spreads that taste flat, metallic, or overly vinegary because manufacturers skip the slow-reduction process.
Ignoring the traditional techniques leads to predictable failures:
-
Watery Consistency: Grinding the peppers and skipping the crucial overnight straining step leaves you with a thin, runny soup instead of a thick, spreadable paste.
-
Loss of Smokiness: Baking peppers in a low-heat oven without charring the skin strips the spread of its signature campfire depth.
-
Bitter Overtones: Leaving too much of the burnt black skin on the peppers imparts a harsh, acrid bitterness that ruins the sweetness of the roasted flesh.
Mastering authentic ajvar changes your pantry game entirely. When you spread rich, smoky, oil-emulsified red pepper paste onto warm sourdough, you experience a flavor profile that no industrial factory can replicate.
The Essential Ingredients for Traditional Ajvar
-
The Peppers: Seek out long, thick-fleshed sweet red peppers (often labeled as Kapija or longhorn peppers in Mediterranean markets). If unavailable, large, sweet red bell peppers with thick walls will work nicely.
-
The Eggplant: Choose one firm, shiny medium globe eggplant. Its role is strictly functional: it adds natural pectin and a velvety texture to emulsify the oil.
-
The Oil: Use a clean, neutral high-smoke-point oil. Sunflower oil or canola oil is traditional; avoid olive oil, as its intense flavor profile overpowers the sweet subtlety of the roasted peppers.
-
The Aromatics: A few cloves of fresh garlic, mashed into a paste, and high-quality sea salt. Some regional variations add a splash of mild vinegar or a touch of hot chili pepper (ljuti ajvar) for heat.
Step-by-Step Actionable Making Guide
Treat this workflow like a slow-cooking ritual. Every phase from the charring to the final reduction builds layers of flavor.
-
Char the Vegetables: Preheat your oven to 450°F (230°C), or fire up an outdoor charcoal grill (preferred for maximum smokiness). Wash and dry your red peppers and eggplant completely. Prick the eggplant with a fork. Place them whole on a baking sheet or directly on the grill grates. Roast, turning every 10 minutes, until the skins are entirely charred and blistered, and the flesh is completely collapsed and tender (about 45 to 60 minutes).
-
The Steaming Secret: Transfer the piping hot charred vegetables immediately into a large metal or glass bowl and cover it tightly with plastic wrap. Let them steam for 20 minutes. This traps the residual heat, loosening the skins from the flesh so they slide off effortlessly without scrubbing.
-
Peeling and Seed Extraction: Peel away the blackened skins under a gentle trickle of cool running water. Remove the stems and core from the peppers, scraping away most of the seeds. Peel the charred skin off the eggplant and discard it, keeping only the soft, smoky interior flesh.
-
The Overnight Draining Protocol: Transfer the cleaned pepper and eggplant flesh into a large colander set over a deep bowl. Let them drain of excess bitter juices for at least 4 hours, or ideally overnight in the refrigerator. This step is non-negotiable for achieving a thick, rich texture.
-
Chining or Mincing: Finely chop the drained vegetables by hand with a sharp chef’s knife, or pulse them in a food processor. Traditionalists prefer hand-chopping or passing them through a meat grinder to maintain a rustic texture, avoiding a baby-food puree consistency.
-
The Slow Reduction: Pour ½ cup of neutral sunflower oil into a heavy-bottomed Dutch oven or wide pot over medium heat. Add the minced pepper and eggplant mixture. Season with sea salt to taste. As it heats up, begin drizzling in small amounts of the remaining oil periodically.
-
The Simmer: Reduce the heat to low. Simmer the mixture uncovered for 2 to 3 hours, stirring frequently with a wooden spoon to prevent sticking or scorching. As the moisture evaporates, the mixture will darken in color, thicken into a rich paste, and the oil will neatly emulsify into the spread.
-
Jarring and Preservation: Pack the hot ajvar tightly into sterilized glass jars, leaving a small headspace. Pour a thin layer of leftover warm oil on top of each jar to seal out air, then seal tightly. Store in the refrigerator for up to a month, or process in a water bath canner for shelf-stable long-term storage.
Real-World Application: The Balkan Table Experience
Imagine hosting a casual weekend brunch or an evening gathering of friends. Instead of opening a tub of store-bought dip, you place a ceramic bowl of deep mahogany ajvar on the table alongside warm crusty bread, crumbled feta cheese, and grilled sausages.
The first bite hits your palate with a wave of deep, sweet smoke, followed by the savory richness of emulsified oil and garlic. Your guests stop mid-sentence to ask what makes the spread taste so remarkably complex. That is the magic of traditional ajvar: it turns simple pantry staples into an unforgettable culinary centerpiece.
Implementation Strategies for Success
-
Embrace the Grill: If weather permits, roast your peppers over actual hardwood charcoal. The natural smoke penetrates the thick pepper walls in a way that an indoor oven simply cannot replicate.
-
Patience in the Pot: Do not rush the reduction phase. Simmering ajvar low and slow cooks out the raw water content, concentrating the sugars and melding the oil and vegetable starches into a cohesive spread.
-
Adjusting the Heat: If you prefer a spicy kick (ljuti), roast two or three red chili peppers alongside your bell peppers during the initial charring step.
Classic Ajvar vs. Store-Bought Alternatives
| Feature | Commercial Store-Bought | Traditional Homemade |
| Texture | Often watery, thickened with starch or tomato paste | Thick, rustic, jam-like emulsion |
| Flavor Profile | Flat, vinegary, or overly metallic | Deeply sweet, smoky, and complex |
| Ingredients | Peppers, tomato puree, modified starches, preservatives | Peppers, eggplant, sunflower oil, garlic, salt |
| Oil Integration | Separated or synthetic agents | Naturally emulsified through slow reduction |
Common Mistakes and How to Fix Them
-
Mistake: The final ajvar is watery and separates into liquid pools on the plate.
-
Fix: You skipped the overnight draining step, or you didn’t simmer the paste long enough to evaporate the residual vegetable water. Simmer longer uncovered while gradually adding oil.
-
-
Mistake: The spread tastes unpleasantly bitter and burnt.
-
Fix: Too much blackened skin was left on the peppers during the peeling process. Always peel under running water and strip away heavy carbon spots.
-
-
Mistake: The flavor feels flat and lacks depth.
-
Fix: The peppers were baked instead of charred, missing that essential smoke factor. Ensure your oven broiler or grill gets hot enough to genuinely blister and blacken the skins.
-
Expert-Level Insights and Insider Knowledge
Traditional grandmothers (babe) in the Balkans know a subtle secret: the quality of ajvar depends heavily on the sugar content of the peppers. Late-season red peppers grown under hot summer suns accumulate high natural sugars, which caramelize naturally during the multi-hour simmer without requiring any added sweeteners.
Another insider tip involves the oil addition technique. Rather than dumping all the oil in at once, professional home cooks add the oil in increments throughout the 3-hour simmer. This technique forces the oil to bond chemically with the escaping starches and proteins of the pepper pulp, creating a glossy, stable emulsion that stays rich and cohesive on the spoon.
Frequently Asked Questions
-
Can I use green bell peppers to make ajvar?
Traditional ajvar is strictly made with red peppers. Green peppers contain different sugars and chlorophyll, resulting in a bitter, grassy taste and an unappealing olive-brown color when cooked down.
-
How long does homemade ajvar keep in the fridge?
When sealed tightly with a thin protective layer of oil on top to block air exposure, homemade ajvar easily keeps in the refrigerator for 3 to 4 weeks.
-
Can I freeze homemade ajvar?
Yes. Pack cooled ajvar into freezer-safe containers or ziplock bags, leaving room for expansion, and freeze for up to 6 months. Thaw overnight in the refrigerator before using.
-
Do I have to include eggplant in ajvar?
While some purist regions make “pure pepper ajvar,” adding a single small eggplant is widely practiced because its natural pectin acts as a binder, giving the spread its signature luxurious body.
-
What is the difference between ajvar and pindur?
While both are Balkan roasted pepper spreads, ajvar relies purely on sweet peppers and eggplant, whereas pindur typically includes crushed tomatoes and sometimes feta cheese or hot peppers.
-
How do I make it spicy?
Add 2 to 4 hot red chili peppers to the roasting pan alongside your bell peppers, adjusting the count based on your heat tolerance.
-
Can I use canned roasted peppers in a pinch?
You can, but you will lose the signature smoky depth that comes from charring fresh peppers over an open flame or grill.
-
Why is my ajvar turning out orange instead of deep red?
This usually happens if you use too much eggplant relative to the red peppers, or if your red peppers lacked deep pigmentation. Stick to a ratio of roughly 4 to 5 pounds of red peppers to 1 medium eggplant.
Action Checklist
-
What to do:
-
Char the pepper and eggplant skins completely until blackened and blistered.
-
Let the cooked vegetables steam in a covered bowl to make peeling effortless.
-
Drain the cleaned pepper pulp overnight to eliminate excess water.
-
Simmer the paste low and slow for at least 2 to 3 hours, stirring constantly.
-
-
What to avoid:
-
Do not use olive oil, as its intense flavor will mask the delicate roasted pepper taste.
-
Do not blend the mixture into a completely smooth baby-food puree; keep it rustic.
-
Do not rush the reduction process over high heat, or the spread will scorch at the bottom.
-
Making authentic ajvar at home is an act of culinary devotion that rewards you with a smoky, rich spread leagues ahead of any store-bought jar. Roast low, drain thoroughly, and simmer patiently.