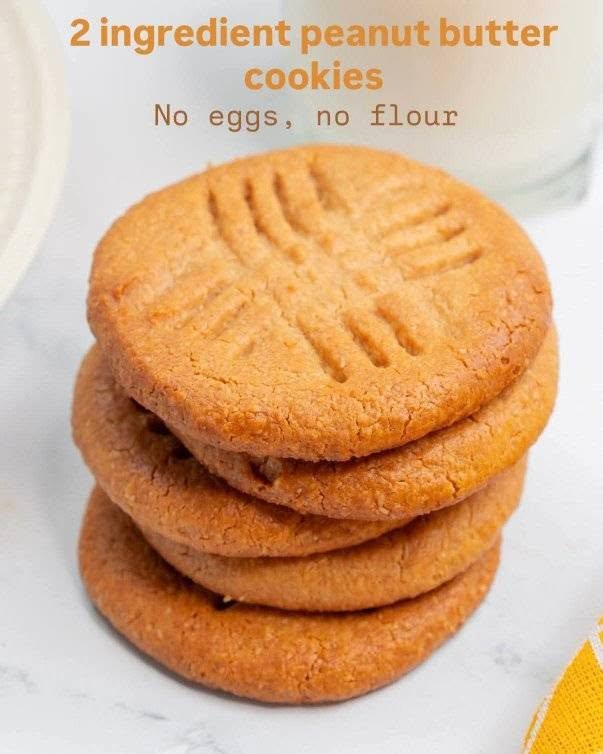
The Easiest 2-Ingredient Peanut Butter Cookies: The Secret to the Ultimate Classic Crisscross
Craving warm, homemade cookies but have zero energy for a complicated baking project? Discover the foolproof, two-ingredient wonder that delivers bakery-quality flavor in minutes.
There is an unspoken rule in the modern kitchen: baking requires precision, a grocery list of twenty items, and at least an hour of your evening. When you are staring down a long workday, wrestling with kids, or simply exhausted by adulting, the thought of measuring out flour, baking soda, brown sugar, vanilla extract, and softened butter feels completely out of reach.
So, you close your recipe app and reach for store-bought snacks packed with preservatives and hidden corn syrups.
It is enough to make you feel like homemade treats are a luxury reserved exclusively for weekends or professional bakers.
Here is the truth nobody in the traditional baking ecosystem wants to admit: sometimes, simple chemistry outperforms complexity. You do not need a pantry full of specialized ingredients to create a satisfying, protein-rich cookie that melts in your mouth and satisfies your sweet tooth. In fact, one of the best-kept secrets in home baking relies on a brilliant structural reaction between just two everyday pantry staples.
By the time you finish reading this comprehensive guide, you will master the exact ratios, science, and techniques required to bake perfect, gluten-free, two-ingredient peanut butter cookies—complete with that iconic, nostalgic crisscross fork pattern on top.
The Science of Two Ingredients: How It Actually Works
To appreciate how a recipe with only two components can hold its shape and taste incredible, you have to look at the structural mechanics of baking.
Standard cookies rely on flour for structure, eggs for binding, and sugar for sweetness and spread. In a two-ingredient peanut butter cookie, peanut butter acts as both the fat and the structural binder, while a sweetener (typically condensed milk or regular sugar paired with an egg, but in the purest 2-ingredient version, sweetened condensed milk or a single egg) holds the matrix together.
When you use natural or regular creamy peanut butter combined with sweetened condensed milk (or a single egg and granulated sugar, depending on the exact variant you choose), the proteins in the nut butter coagulate under heat. They trap tiny pockets of air while the natural oils create a rich, tender crumb without needing a single grain of wheat flour.
Why It Matters: The Modern American Baking Dilemma
In contemporary American households, dietary restrictions like gluten sensitivities, dairy intolerances, and severe time constraints have fundamentally changed how we snack. People want clean labels, low-stress preparation, and guilt-free indulgences that don’t require spending forty dollars at a specialty health food store.
The Consequences of Relying on Processed Convenience Snacks
When people abandon home baking out of sheer fatigue, they often default to highly processed store-bought cookies. These packaged alternatives come with heavy downsides:
-
Refined Oils and Preservatives: Mass-produced cookies rely on shelf-stable trans fats, palm oils, and chemical preservatives to stay fresh on grocery shelves for months.
-
Spike-and-Crash Blood Sugar: Packed with high-fructose corn syrup, they cause sharp insulin spikes that leave you feeling sluggish and hungry an hour later.
-
Hidden Costs: Buying specialty gluten-free or allergy-friendly cookies online or at boutique markets can easily drain ten to fifteen dollars per box.
Mastering a fast, whole-ingredient alternative puts control back into your hands, saving money while nourishing your body with healthy fats and protein.
Deep-Dive Main Content Sections
Achieving bakery-level results with only two ingredients requires understanding your raw materials and respecting the physics of the bake.
1. Choosing the Right Peanut Butter
The success of this recipe hinges entirely on the type of peanut butter you select.
-
Regular Creamy Peanut Butter (e.g., Jif or Skippy): Because these brands contain stabilizers and added sugars or oils, they provide a thick, predictable consistency that holds its shape brilliantly in the oven.
-
Natural Peanut Butter: If you use 100% natural peanut butter (the kind that separates with a pool of oil on top), you must stir it exceptionally well and drain off excess oil. Otherwise, your cookies will spread into flat, greasy puddles on the baking sheet.
2. The Sweetener Variable: Condensed Milk vs. Egg
Depending on which classic 2-ingredient variation you prefer:
-
The Peanut Butter + Sweetened Condensed Milk Method: Yields a fudgy, chewy, incredibly rich cookie that requires no extra sugar.
-
The Peanut Butter + Granulated Sugar (or Egg) Method: Creates a more traditional, crumbly texture reminiscent of childhood bake sales.
3. The Psychology of the Crisscross Fork Pattern
Why do we press a fork into peanut butter cookies? It isn’t just aesthetic nostalgia. Peanut butter cookie dough is dense and doesn’t spread or flatten naturally on its own in the oven like a butter-and-flour cookie. Pressing a fork in a crisscross pattern serves two vital purposes:
-
Structural Flattening: It compresses the dense ball of dough to an even thickness, ensuring the center bakes at the exact same rate as the edges.
-
Texture Creation: The ridges created by the tines of the fork caramelize slightly in the oven, providing a delightful textural contrast to the soft interior.
Step-by-Step Actionable Guide: Baking the Perfect Batch
Follow this structured, foolproof framework to whip up a batch of cookies in under fifteen minutes.
Step 1: Prep and Preheat
Preheat your oven to 350°F (175°C). Line a standard baking sheet with parchment paper or a silicone baking mat. This prevents sticking and ensures even heat distribution on the bottoms of your cookies.
Step 2: Combine the Two Core Ingredients
In a clean mixing bowl, combine 1 cup of your chosen creamy peanut butter with 1 cup of sweetened condensed milk (or 1 large egg plus 1 cup of sugar, depending on your preferred ratio). Stir vigorously with a spatula until the mixture pulls away from the sides of the bowl and forms a thick, cohesive dough.
Step 3: Portion and Roll
Scoop tablespoon-sized portions of the dough and roll them gently between your palms into smooth balls. Place them about two inches apart on your lined baking sheet, as they will expand slightly during baking.
Step 4: The Iconic Crisscross
Take a standard dining fork, dip the tines into a small dish of water or granulated milk to prevent sticking, and press gently down across the top of each ball. Lift the fork, turn it 90 degrees, and press down again to create a neat, professional crisscross grid pattern.
Step 5: Bake and Cool
Bake on the middle rack for 8 to 10 minutes. Look for the edges to turn a light golden brown. Crucial rule: Do not overbake! They will look soft and undercooked when you pull them out of the oven. Let them sit undisturbed on the hot baking sheet for 5 minutes so they can firm up naturally.
Real-World Scenarios
To see how this fits into daily life, let’s examine two common lifestyle profiles.
Scenario A: The Busy Parent in Ohio
-
The Routine: Juggling remote work and two kids who walk through the door demanding an after-school snack, with zero patience for complicated baking.
-
The Challenge: Avoiding processed packaged snacks while putting something warm and homemade on the table in under twenty minutes.
-
The Fix: Pulling out a jar of peanut butter and a can of condensed milk. The kids help roll the dough balls and press the fork patterns, turning snack prep into a fun, 15-minute family bonding activity.
Scenario B: The Solo College Student in Texas
-
The Routine: Living in a dorm kitchen with minimal utensils, a tiny mini-fridge, and a modest budget.
-
The Challenge: Craving a sweet comfort food treat without buying a pantry full of baking supplies that will expire unused.
-
The Fix: Buying just two ingredients from the campus convenience store, mixing them in a plastic bowl with a spoon, and baking a small batch on a toaster-oven tray.
Comparison Table: 2-Ingredient Methods
| Method Variant | Ingredients Used | Texture Profile | Best For |
| The Condensed Milk Method | Peanut Butter + Sweetened Condensed Milk | Fudgy, rich, chewy, and deeply decadent. | Sweet tooth lovers and ultra-fast prep. |
| The Egg & Sugar Method | Peanut Butter + Granulated Sugar (or Egg) | Traditional, slightly crumbly, classic bake-sale feel. | Those looking for a classic, lighter crunch. |
| The Store-Bought Shortcut | Pre-made cookie dough packs | Variable quality, high cost, preservatives. | Emergencies only (not recommended). |
Pros & Honest Cons of 2-Ingredient Baking
It is vital to maintain realistic expectations when pursuing ultra-minimalist recipes.
The Pros
-
Incredible Speed: From mixing bowl to cooling rack in under fifteen minutes.
-
Budget-Friendly: Eliminates the need to buy flour, vanilla, baking powder, and butter.
-
Naturally Gluten-Free: Perfect for individuals managing celiac disease or gluten sensitivities, provided you check labels.
The Cons
-
Flavor Limitation: They taste distinctly of peanut butter. If you are looking for complex notes of brown butter, vanilla, and chocolate chips, you will need a traditional recipe.
-
Texture Sensitivity: If overbaked by even two minutes, they can turn dry and crumbly due to the lack of flour and starches.
Common Mistakes and How to Fix Them
Even with only two ingredients, small errors can ruin your batch.
-
Mistake 1: Using natural peanut butter with excess oil.
-
The Fix: If your oil has separated, pour off the excess or mix it thoroughly until completely emulsified before measuring. Better yet, stick to conventional creamy peanut butter for foolproof structure.
-
-
Mistake 2: Skipping the cooling rest on the pan.
-
The Fix: Because these cookies lack flour gluten networks, they are fragile when hot. Moving them immediately to a wire rack will cause them to crumble into pieces. Let them set on the hot baking sheet for 5 minutes.
-
-
Mistake 3: Pressing the fork down too hard.
-
The Fix: Pushing the fork all the way through to the baking sheet splits the cookie in half. Press only halfway down to create a clean, decorative impression.
-
Expert-Level Insights: Insider Knowledge
If you want to elevate your simple cookies like a professional pastry chef, keep these non-obvious principles in mind:
-
The Flaky Sea Salt Finish: Right when the cookies emerge from the oven while they are still resting on the hot pan, sprinkle a tiny pinch of flaky Maldon sea salt over each crisscross. The contrast between sweet, nutty peanut butter and bright sea salt transforms a basic snack into a gourmet experience.
-
Temperature Control: If your dough feels too sticky to roll into clean balls, pop the mixing bowl into the refrigerator for 10 minutes to firm up the fats.
Frequently Asked Questions
1. Can I use crunchy peanut butter instead of creamy?
Yes! Crunchy peanut butter works wonderfully and adds a delightful rustic texture. Just note that the crisscross fork pattern might look slightly more textured due to the nut pieces.
2. Why did my cookies crumble apart when I touched them?
You likely tried to move them from the oven tray too quickly, or your peanut butter was too dry. Always let them rest on the warm baking sheet for 5 minutes so the fats can solidify.
3. Are these cookies naturally gluten-free?
Yes, standard peanut butter and condensed milk contain no wheat flour. Just double-check your ingredient labels to ensure no cross-contamination occurred at the manufacturing facility.
4. Can I add chocolate chips to this recipe?
Technically, that makes it a three-ingredient recipe, but folding in a handful of mini chocolate chips or pressing a Hershey’s kiss in the center right after baking is a delicious upgrade!
5. How should I store leftovers?
Store them in an airtight container at room temperature with a slice of white bread inside (the cookies will absorb moisture from the bread and stay soft for days). They will keep for up to 5 days.
6. Can I use maple syrup or honey as a sweetener?
Liquid sweeteners add too much moisture to the ratio and will cause your cookies to spread into a runny mess in the oven. Stick to condensed milk or granulated sugar for structure.
7. Why do peanut butter cookies have a crisscross pattern?
It flattens the dense dough evenly to ensure consistent baking and creates a textured surface that catches sugar granules and heat for optimal caramelization.
8. Can I freeze the baked cookies?
Absolutely. Let them cool completely, then layer them between sheets of parchment paper in a freezer-safe container for up to two months. Thaw at room temperature before enjoying.
Action Checklist
What to Do:
-
Preheat your oven to 350°F and line your baking sheet with parchment paper.
-
Combine 1 cup of creamy peanut butter with 1 cup of sweetened condensed milk.
-
Roll equal-sized dough balls and space them two inches apart.
-
Press a fork in a clean crisscross pattern across the top of each ball.
-
Bake for 8 to 10 minutes and let them cool on the tray for 5 minutes.
What to Avoid:
-
Do not overbake your cookies past the 10-minute mark.
-
Avoid moving the cookies immediately out of the oven while they are piping hot.
-
Do not use liquid sweeteners like maple syrup or honey.
-
Avoid using separated, oily natural peanut butter without thorough mixing.
Conclusion
Baking delicious, satisfying treats doesn’t require spending hours in the kitchen or wrestling with complicated ingredient lists. With just two simple staples and a quick crisscross fork press, you can create warm, comforting peanut butter cookies that satisfy cravings instantly. Life is busy, but your snack time should always feel like a treat.
Ditch the complicated baking manuals, grab a jar of peanut butter and a can of condensed milk, and enjoy homemade cookies in under fifteen minutes.