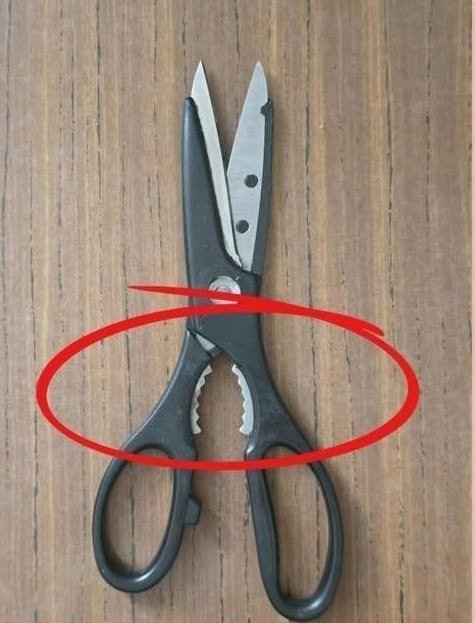
What Are Those Secret Metal Teeth on Your Kitchen Scissors? (And Why They Keep Biting You)
If you’ve ever reached into a utility drawer, grabbed a pair of kitchen shears, and accidentally sliced your finger on the mysterious little metal teeth nestled near the pivot point, you are not alone. It is a frustrating, painful rite of passage for many home cooks. But what on earth is that jagged notch actually for?
Ever cut your fingers on the metal teeth inside your kitchen scissors? Discover their hidden purpose, from cracking nuts to opening stubborn jars, and how to use them safely.
The Mystery of the Kitchen Shear Notch
Kitchen scissors are rarely just ordinary scissors. Unlike office shears designed purely for paper, heavy-duty culinary scissors are engineered as multi-functional multi-tools meant to handle everything from spatchcocking a chicken to opening stubborn food packaging.
Yet, almost every time someone unboxes a new pair of heavy-duty shears, they stare at those aggressive little teeth or notches sitting right between the handles near the hinge with absolute confusion.
If you’ve already nicked your fingers on them twice, you know they are dangerously sharp. But far from being a manufacturing defect or an accidental design flaw, those metal teeth are a deliberate, multi-purpose mechanical grip designed to save you time and counter space.
What Those Metal Teeth Are Actually Designed For
Depending on the specific make and model of your kitchen shears, that inner notch serves up to four distinct culinary purposes:
1. A Heavy-Duty Built-In Nutcracker
The most common use for those inner teeth is cracking nuts. By placing a walnut, pecan, or hazelnut directly into the notched gap between the handles and squeezing down, you leverage the mechanical advantage of the tool. The teeth bite into the shell, cracking it open cleanly without needing a separate, dedicated nutcracker tool taking up drawer space.
2. Cracking and Gripping Seafood Shells
Preparing crab legs or lobster tails can be notoriously messy work. Those serrated teeth provide a heavy-duty, non-slip grip designed to crush through tough chitinous shells without slipping or spraying shell fragments across your kitchen counter.
3. Opening Stubborn Jars and Bottles
Many kitchen shear designs incorporate textured grips or notches that double as a leverage tool for twisting off stubborn twist-off bottle caps, vacuum-sealed jar lids, or plastic safety seals that refuse to budge.
4. Stabilizing Bones and Fibrous Stems
When you are cutting through slippery materials—like chicken joints, tough cartilage, or thick squash stems—items have a frustrating tendency to slide forward toward the tips of the blades. Those inner teeth act as a stabilizer, catching the slippery item close to the pivot point where your hand has maximum cutting leverage.
Comparative Analysis: Standard Scissors vs. Multi-Function Kitchen Shears
| Feature | Standard Office Scissors | Heavy-Duty Kitchen Shears |
| Blade Construction | Lightweight stainless steel for paper and light fabrics. | High-carbon stainless steel built for food contact and bone. |
| Inner Pivot Area | Smooth, continuous metal with no extra features. | Contains integrated metal teeth/notches for mechanical leverage tasks. |
| Primary Risk | Dull edges; mild cuts from tips. | Finger nicks from inner utility teeth; requires careful storage. |
How to Stop Nictitating Your Fingers (Safety Tips)
Because those teeth sit right in the inner transition space where your hand naturally rests, they are notorious for catching skin when you reach blindly into a utensil drawer or wash the tool in soapy dishwater. Keep your fingers safe with these rules:
-
Rule 1: Never Store Shears Loose in a Drawer.
-
Tossing kitchen shears loose into a crowded drawer exposes those sharp inner teeth and blades to passing hands. Store them in a dedicated knife block slot, hang them on a magnetic strip, or use a protective plastic blade sheath.
-
-
Rule 2: Mind Your Grip When Picking Them Up.
-
Always pick up kitchen shears by the outer plastic or rubber loops of the handles, rather than sliding your fingers down the shaft near the inner hinge.
-
-
Rule 3: Wash with a Brush, Not a Bare Sponge.
-
When cleaning your shears, use a long-handled dish brush or a folded cloth to wipe down the blades and pivot area, keeping your bare skin away from the inner teeth.
-
Frequently Asked Questions
1. Can I sharpen the inner teeth of my kitchen shears?
Generally, no. Those teeth are meant for crushing and gripping rather than slicing, so they do not require a razor-sharp edge. Attempting to file them down can ruin their mechanical grip.
2. Do all kitchen scissors have these teeth?
No. Traditional, lightweight kitchen shears meant only for snipping herbs or cutting parchment paper often have a smooth, simple pivot point. The integrated teeth are exclusive to heavy-duty, multi-purpose culinary shears.
3. Are kitchen shears dishwasher safe?
Many modern kitchen shears claim to be dishwasher safe, but high heat and harsh detergents can rust the pivot screw or degrade plastic handle grips over time. Hand-washing and drying them immediately is always the safest bet.
Action Checklist
What to Do:
-
Inspect your kitchen shears to see which specific utility notches or teeth yours are equipped with.
-
Move your shears to a knife block slot, magnetic strip, or protective sheath to prevent accidental finger cuts.
-
Use the inner notch the next time you are cracking nuts or prepping seafood.
What to Avoid:
-
Reaching blindly into a messy utensil drawer where kitchen shears are stored openly.
-
Running bare fingers or a flat sponge directly across the inner pivot teeth while washing dishes.
Those frustrating metal teeth hiding inside your kitchen scissors aren’t there to torment your fingers—they are a clever, multi-purpose mechanical tool designed to crack nuts, crush seafood, and anchor slippery ingredients. Now that you know their secret, you can put them to work safely and keep your fingers out of harm’s way!