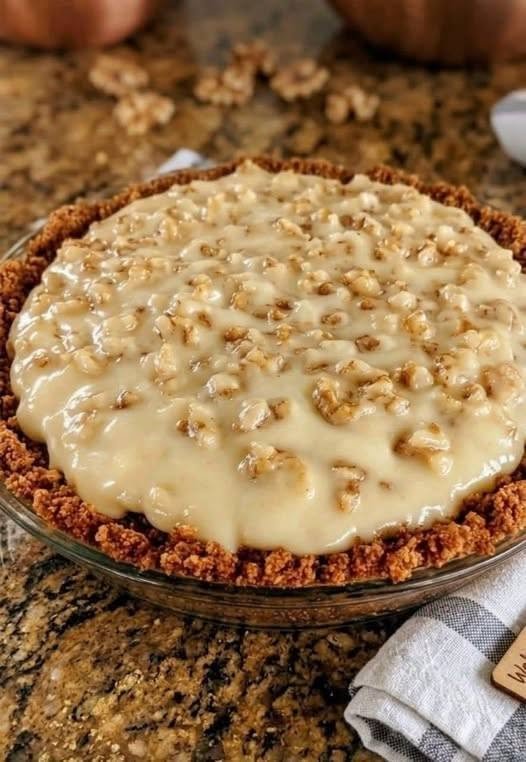
Grandma’s Creamy Walnut Pie
Some desserts have a way of bringing generations together, and Grandma’s Creamy Walnut Pie is one of those treasured recipes. The moment it begins baking, your kitchen fills with the irresistible aroma of toasted walnuts, warm vanilla, buttery pastry, and rich brown sugar. It’s the kind of scent that instantly makes everyone wander into the kitchen asking, “Is it ready yet?”
One slice delivers everything you could want in a homemade pie—a flaky, golden crust, a silky custard-like filling, and crunchy walnuts nestled throughout every creamy bite. It’s rich without being overwhelming, sweet with just the right amount of nuttiness, and comforting enough to make any ordinary day feel like a special occasion.
Whether you’re baking it for Thanksgiving, Christmas, a Sunday family dinner, or simply because you’re craving an old-fashioned dessert, this pie is guaranteed to impress. Best of all, it’s made with simple pantry ingredients and straightforward steps, making it perfect for both experienced bakers and beginners alike.
If you’ve been searching for a timeless walnut pie recipe that’s creamy, decadent, and full of homemade charm, you’ve just found your new favourite.
💛 Why You’ll Love This Recipe
- 🥧 Easy to Make: Simple steps with everyday ingredients.
- 💰 Budget-Friendly: Uses affordable pantry staples.
- 👩🍳 Beginner-Friendly: Great for first-time pie bakers.
- 🥜 Rich & Creamy: A smooth custard filling with crunchy walnuts in every bite.
- 🎄 Perfect for Holidays: Ideal for Thanksgiving, Christmas, Easter, and family gatherings.
- ☕ Wonderful with Coffee: A perfect afternoon dessert.
- ❤️ Comforting & Nostalgic: Inspired by classic homemade family recipes.
- ❄️ Make-Ahead Friendly: Even more delicious after chilling overnight.
- 🍽️ Crowd-Pleasing: A guaranteed hit at potlucks and celebrations.
Pro Tip: Toast the walnuts before adding them to the filling to deepen their flavour and add a delicious crunch.
🧾 Ingredients (With Exact Measurements + Pro Notes)
For the Pie Crust
Unbaked 9-inch Pie Crust
- 1 prepared pie crust (about 230 g / 8 oz)
A homemade buttery crust offers the best flavour, but a quality store-bought crust works beautifully.
For the Filling
Large Eggs
- 3 large (about 150 g / 5.3 oz without shells)
Provide structure and create the creamy custard filling.
Light Brown Sugar
- 150 g (¾ cup / 5.3 oz)
Adds rich caramel sweetness.
Granulated Sugar
- 50 g (¼ cup / 1.8 oz)
Balances the flavour and texture.
Heavy Cream
- 240 ml (1 cup / 8 fl oz)
Creates the luxurious creamy filling.
Unsalted Butter (Melted)
- 60 g (¼ cup / 2 oz)
Adds richness and a silky texture.
Pure Vanilla Extract
- 2 teaspoons (10 ml)
Enhances the nutty flavours.
Salt
- ¼ teaspoon
Balances the sweetness.
Cornstarch
- 15 g (2 tablespoons / 0.5 oz)
Helps the filling set while remaining creamy.
Chopped Walnuts
- 180 g (2 cups / 6.3 oz)
The star ingredient, providing crunch and nutty flavour.
Optional Ingredients
Ground Cinnamon
- ½ teaspoon
Adds warmth.
Maple Syrup
- 2 tablespoons
Adds extra depth and sweetness.
Bourbon
- 1 tablespoon
For a rich Southern-inspired flavour.
Whipped Cream
For serving.
Smart Ingredient Swaps
- Pecans instead of walnuts for a different nutty profile.
- Half-and-half instead of heavy cream for a lighter filling.
- Gluten-free pie crust for a gluten-free dessert.
- Coconut cream for a dairy-free version.
🥗 Nutritional Information (Per Serving)
Approximate values (based on 8 servings):
- Calories: 480
- Protein: 7 g
- Carbohydrates: 35 g
- Fat: 36 g
- Fiber: 2 g
- Vitamin E: Good source
- Magnesium: Moderate
- Calcium: Moderate
- Omega-3 Fatty Acids: Small amount (from walnuts)
Dietary Information
- ❌ Keto-Friendly
- ❌ Vegan
- ❌ Dairy-Free
- ❌ Gluten-Free (unless using a gluten-free crust)
- ⚖️ Weight-Loss Friendly: Best enjoyed occasionally as a rich dessert.
Did You Know? Walnuts are one of the few nuts naturally rich in plant-based omega-3 fatty acids, making them a nutritious addition to baked treats.
🍳 Kitchen Tools Needed
Basic Equipment
- 9-inch pie plate
- Mixing bowls
- Whisk
- Measuring cups
- Measuring spoons
- Rubber spatula
- Baking tray
- Cooling rack
Optional Upgrades
- Food processor (for homemade crust)
- Digital kitchen scale
- Pie shield or aluminium foil to protect crust edges
No whisk? A fork works well for combining the filling ingredients.
👩🍳 Step-by-Step Instructions
Step 1: Preheat the Oven
Preheat your oven to 175°C (350°F).
Place the pie crust into a 9-inch pie dish and crimp the edges as desired.
Step 2: Toast the Walnuts
Spread the chopped walnuts on a baking tray.
Toast for 6–8 minutes, stirring once halfway through.
Visual cue: The walnuts should become fragrant and lightly golden.
⚠️ What should NOT happen: Burnt walnuts taste bitter and can overpower the pie.
Allow them to cool.
Step 3: Prepare the Filling
In a large bowl, whisk together:
- Eggs
- Brown sugar
- Granulated sugar
- Cornstarch
- Salt
Whisk until smooth.
Step 4: Add the Cream
Whisk in:
- Heavy cream
- Melted butter
- Vanilla extract
If using, stir in the maple syrup and cinnamon.
The mixture should be smooth, silky, and lump-free.
Step 5: Fold in the Walnuts
Gently fold the toasted walnuts into the filling.
Make sure they are evenly distributed.
Pro Tip: Reserve a small handful of walnuts to sprinkle on top for a beautiful bakery-style finish.
Step 6: Fill the Pie
Pour the filling into the prepared pie crust.
Smooth the top with a spatula.
Step 7: Bake
Bake for 45–55 minutes.
The pie is done when:
- The edges are set.
- The centre has a gentle wobble.
- The crust is golden brown.
⚠️ Do not overbake. The filling will continue to set as it cools.
If the crust browns too quickly, cover the edges with foil.
Step 8: Cool Completely
Transfer the pie to a cooling rack.
Cool for at least 2 hours before slicing.
For the cleanest slices, refrigerate for an additional 2–4 hours.
👨🍳 Chef-Level Tips & Mistakes to Avoid
Pro Tips
- Toast the walnuts for deeper flavour.
- Use room-temperature eggs for a smoother filling.
- Chill the pie before serving for neat slices.
- Brush the crust with egg wash for extra colour.
- Add a pinch of flaky sea salt just before serving to enhance the sweetness.
Common Mistakes
Runny Filling
Cause: Underbaking.
Fix: Bake until the edges are set and the centre only slightly jiggles.
Tough Crust
Cause: Overworking homemade pastry.
Handle the dough gently.
Soggy Bottom
Cause: Filling added to a warm or damp crust.
Use a chilled crust and bake on the lower oven rack if needed.
Burnt Walnuts
Toast them carefully and keep a close eye on them—they can burn quickly.
🌟 Variations & Customisations
🍫 Chocolate Walnut Pie
Add:
- 100 g (½ cup) dark chocolate chips
- Chocolate drizzle after baking
Perfect for chocolate lovers.
🥗 Lighter Version
- Use half-and-half instead of heavy cream.
- Reduce the sugar by one-quarter.
- Add extra walnuts for texture.
👧 Kids-Friendly Version
Serve with:
- Vanilla ice cream
- Chocolate sauce
- Caramel drizzle
🍽️ Restaurant-Style Version
Top with:
- Fresh whipped cream
- Candied walnuts
- Caramel sauce
- A sprinkle of flaky sea salt
🌍 Creative Twist
Try adding:
- Orange zest
- Espresso powder
- Pumpkin spice
- Chopped dark chocolate
- Dried cranberries
🧊 Storage & Reheating Guide
Refrigerator
Store covered for 4–5 days.
Serve chilled or allow to come to room temperature.
Freezer
Wrap tightly and freeze for up to 2 months.
Thaw overnight in the refrigerator before serving.
Reheating
For a warm slice:
- Heat in a 160°C (320°F) oven for 8–10 minutes.
- Or microwave for 15–20 seconds.
Avoid overheating, as the custard filling can become rubbery.
Pro Tip: This pie is just as delicious served cold with freshly whipped cream.
🍽️ Serving Suggestions
Delicious Pairings
- Vanilla ice cream
- Fresh whipped cream
- Salted caramel sauce
- Fresh berries
- Poached pears
Drinks
- Freshly brewed coffee
- Black tea
- Chai latte
- Hot chocolate
- Spiced apple cider
Garnishing Ideas
- Toasted walnut halves
- Caramel drizzle
- Cinnamon dusting
- Chocolate shavings
- Fresh mint leaves
Plating Tips
Serve each slice on a white dessert plate with a generous dollop of whipped cream, a drizzle of caramel sauce, and a few toasted walnut halves for an elegant presentation.
Did You Know? Toasting walnuts before baking not only enhances their flavour but also helps maintain their crunch inside creamy desserts.
❓ Frequently Asked Questions
1. Can I make Grandma’s Creamy Walnut Pie ahead of time?
Yes. It’s actually even better after chilling overnight, as the filling becomes firmer and the flavours develop.
2. Can I use a store-bought pie crust?
Absolutely. A ready-made pie crust saves time and still delivers excellent results.
3. Why is my pie filling still runny?
The pie may need a few more minutes in the oven, or it may not have cooled long enough. The filling continues to set as it cools.
4. Should I toast the walnuts?
Yes. Toasting brings out their natural oils and creates a deeper, richer flavour.
5. Can I substitute pecans?
Yes. Pecans make an equally delicious alternative and create a pie similar to a classic pecan pie with a creamier filling.
6. Can I freeze the pie?
Yes. Wrap it tightly in plastic wrap and foil, then freeze for up to two months. Thaw overnight in the refrigerator before serving.
7. What is the best way to serve this pie?
It’s delicious chilled or at room temperature with whipped cream, vanilla ice cream, or a drizzle of caramel sauce.
Make the best Grandma’s Creamy Walnut Pie with this easy recipe! Discover exact measurements, step-by-step instructions, nutrition facts, expert baking tips, tasty variations, storage advice, FAQs, and serving ideas for a rich, creamy homemade dessert.
Some recipes are more than just desserts—they’re traditions passed down through generations, bringing warmth, comfort, and sweet memories to every table. Grandma’s Creamy Walnut Pie is one of those timeless classics that never goes out of style. Whether you’re baking it for a holiday celebration, a family gathering, or simply to satisfy a craving for something rich and comforting, this pie is sure to become a cherished favourite.
If you bake this creamy walnut pie, I’d love to hear how it turned out! Leave a comment with your favourite variation or family baking tip, and don’t forget to share a photo on social media to inspire fellow dessert lovers. Happy baking, and enjoy every creamy, nutty slice!