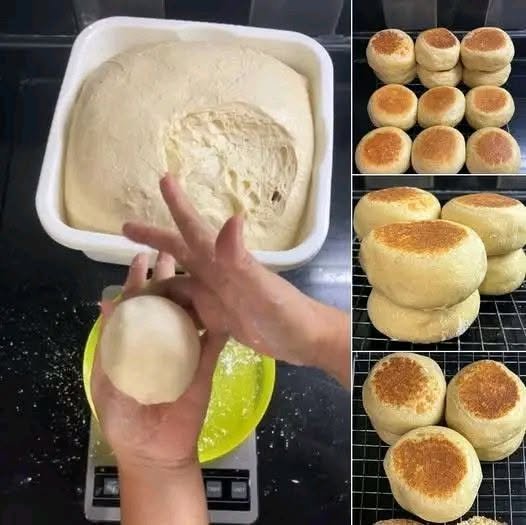
Homemade English Muffins
There is something deeply satisfying about making English muffins at home.
Maybe it is the quiet morning ritual of mixing a simple dough the night before. Maybe it is the smell of buttery bread warming in the kitchen. Or maybe it is that first moment when you split a homemade English muffin with your fingers and discover all those tiny, irregular nooks and crannies inside, just waiting to catch melted butter.
Store-bought English muffins are convenient, but homemade ones have a completely different charm.
They are soft and chewy in the center, lightly crisp and golden on the outside, with a delicate yeasty aroma that makes the whole kitchen smell like a bakery.
And surprisingly, you do not need a fancy oven or special bread machine to make them.
These homemade English muffins are cooked on a skillet or griddle, which gives them their signature golden crust while keeping the inside tender and airy.
The real secret is not complicated technique. It is patience.
Let the dough rise properly, handle it gently, and cook the muffins slowly enough to give the centers time to bake.
Once you taste one warm from the pan with butter melting into those little nooks and crannies, you may wonder why you ever settled for packaged muffins.
Meta description: Learn how to make soft, chewy homemade English muffins with crisp golden edges and classic nooks and crannies. An easy skillet recipe perfect for breakfast, brunch, sandwiches, and meal prep.
Why You’ll Love These Homemade English Muffins
- Soft and chewy: The centers have the classic English muffin texture.
- Crisp on the outside: Cooking them on a skillet creates a beautiful golden crust.
- No oven required: A heavy skillet or griddle is all you need.
- Beginner-friendly: The dough is straightforward and forgiving.
- Budget-friendly: Basic pantry ingredients make several muffins.
- Make-ahead friendly: Prepare the dough ahead for an easier breakfast.
- Freezer-friendly: Freeze extras and warm them whenever you need them.
- Better than store-bought: Freshly cooked muffins have a wonderful aroma and texture.
- Versatile: Use them for breakfast sandwiches, eggs Benedict, toast, or simple butter and jam.
- Perfect for weekends: There is something special about serving homemade bread at brunch.
- Comforting and nostalgic: Warm bread and melted butter never really go out of style.
What Makes an English Muffin Different From Regular Bread?
English muffins are not simply small round loaves of bread.
Traditional English muffins are cooked on a griddle rather than baked entirely in an oven.
They are also known for their characteristic interior texture: small holes and tunnels that create the famous nooks and crannies.
Those little pockets are perfect for catching butter, jam, honey, cream cheese, or a runny egg yolk.
The dough is soft and slightly sticky, and the muffins are usually cooked gently so the outside develops a golden crust while the inside becomes fully cooked.
For the best texture, resist the temptation to cut them with a knife immediately after cooking.
Use a fork to split them.
That rough, uneven surface helps preserve the nooks and crannies.
Ingredients
This recipe makes approximately 10 homemade English muffins.
For the Dough
- 480 g (4 cups) all-purpose flour
- 240 ml (1 cup) warm whole milk
- 120 ml (½ cup) warm water
- 7 g (2¼ teaspoons) active dry yeast
- 1 tablespoon granulated sugar
- 1½ teaspoons fine salt
- 30 g (2 tablespoons) unsalted butter, melted
- 1 large egg, approximately 50 g
- 60 g (½ cup) cornmeal, for dusting
Optional
- Extra butter for cooking
- Semolina or cornmeal for dusting
- A little oil for the skillet
Ingredient Notes
Flour
All-purpose flour works beautifully for this recipe.
Bread flour can also be used if you prefer a slightly chewier muffin.
Milk
Whole milk gives the muffins a tender, slightly rich crumb.
You can use 2% milk, but the texture may be a little less soft.
Yeast
Active dry yeast is used here.
Make sure it is fresh. Old yeast can lead to poor rising and dense muffins.
Egg
The egg adds richness and helps create a soft, tender interior.
Butter
Butter adds flavor and softness.
You can substitute neutral oil, but butter gives a more traditional breakfast-bread flavor.
Cornmeal
Cornmeal is not mainly for flavor.
It prevents the dough from sticking and gives the outside of the muffins their classic slightly grainy texture.
PRO TIP: If you have fine cornmeal, use it for a smoother finish. Coarse cornmeal creates more crunch but can become a little messy when eating.
Nutritional Information
Approximate nutrition per English muffin, assuming 10 muffins:
- Calories: 225
- Protein: 7 g
- Carbohydrates: 37 g
- Fat: 6 g
- Fiber: 2 g
- Sugar: 3 g
Values will vary depending on the exact flour, milk, butter, and toppings used.
Are English Muffins Healthy?
Homemade English muffins can fit into a balanced diet, but they are still primarily a bread product.
For more fiber, replace up to 1 cup of the all-purpose flour with whole-wheat flour.
Adding eggs, Greek yogurt, nut butter, avocado, or smoked salmon can also make breakfast more filling and protein-rich.
Are They Vegetarian?
Yes.
Are They Vegan?
Not as written because the recipe contains milk, butter, and egg.
For a vegan version, use plant-based milk, vegan butter or oil, and an appropriate egg substitute.
Are They Gluten-Free?
Not as written.
A gluten-free flour blend formulated for yeast breads would be needed, and the hydration may require adjustment.
Kitchen Tools Needed
Basic Tools
- Large mixing bowl
- Measuring cups or kitchen scale
- Wooden spoon
- Rolling pin
- Round cutter
- Heavy skillet or griddle
- Spatula
- Cooling rack
- Clean kitchen towel
Optional Tools
- Stand mixer with dough hook
- Digital kitchen scale
- Bench scraper
- Instant-read thermometer
- Pastry brush
No round cutter? Use the rim of a drinking glass or a small bowl approximately 3–4 inches wide.
How to Make Homemade English Muffins
1. Activate the yeast
Pour 240 ml warm milk and 120 ml warm water into a bowl.
The liquid should feel comfortably warm, around 38–43°C (100–110°F).
Add:
- 7 g active dry yeast
- 1 tablespoon sugar
Stir gently.
Let it stand for approximately 5–10 minutes.
The surface should become slightly foamy.
That tells you the yeast is active.
What should NOT happen: If the mixture remains completely flat and shows no sign of activity after 10 minutes, your yeast may be old or the liquid may have been too hot or too cold.
Do not continue with inactive yeast unless you are sure your yeast does not require proofing.
2. Add the wet ingredients
Add:
- 30 g melted butter
- 1 egg
Whisk gently until combined.
The butter should be warm rather than hot.
Hot butter can affect the yeast.
3. Add the flour and salt
Add approximately 400 g of the flour first, along with the salt.
Mix with a wooden spoon.
Gradually add the remaining flour as needed.
You are looking for a soft, slightly sticky dough.
Do not add all the flour automatically if the dough already has the right consistency.
PRO TIP: Humidity and flour brands vary. Measuring flour by weight gives you the most reliable result. The dough should feel soft and slightly tacky, not dry and stiff.
4. Knead the dough
Transfer the dough to a lightly floured surface.
Knead for approximately 7–9 minutes by hand.
Push the dough away with the heel of your hand, fold it back, rotate, and repeat.
The dough should gradually become smoother and more elastic.
If using a stand mixer, knead with the dough hook on low-medium speed for approximately 5–7 minutes.
5. Check the dough
Take a small piece and gently stretch it.
It should stretch without immediately tearing.
It does not need to form an extremely thin windowpane like some enriched bread doughs.
You are looking for a smooth, elastic dough.
6. First rise
Lightly grease a clean bowl.
Place the dough inside and turn it once so the surface is lightly coated.
Cover with a clean towel or plastic wrap.
Let it rise in a warm, draft-free place for approximately 1–1½ hours.
The dough should become noticeably larger and roughly double in volume.
A slightly longer rise is fine if your kitchen is cool.
7. Prepare the work surface
Lightly dust your work surface with flour.
Sprinkle cornmeal over a baking sheet or large tray.
Gently turn the risen dough onto the surface.
Do not punch it down aggressively.
You want to preserve some of the air created during fermentation.
8. Roll the dough
Gently roll the dough to approximately 1.5–2 cm (½–¾ inch) thick.
Try to keep the thickness even.
If one part is much thinner than another, the muffins will cook unevenly.
9. Cut the muffins
Use a round cutter approximately 3–4 inches (7.5–10 cm) wide.
Cut straight down without twisting.
Place each round onto the cornmeal-dusted tray.
Gather the scraps and gently press them together.
Allow them to rest for about 5 minutes, then roll and cut again.
Avoid repeatedly kneading the scraps because this can make those muffins tougher.
10. Second rise
Sprinkle the tops lightly with cornmeal.
Cover loosely with a clean towel.
Let the muffins rest for approximately 30–45 minutes.
They should look slightly puffed.
They do not necessarily need to double in size again.
PRO TIP: Do not skip this short second rise. It helps create lighter muffins with a more open interior.
11. Preheat the skillet
Place a heavy skillet or griddle over medium-low heat.
Allow it to preheat for approximately 5 minutes.
Add a tiny amount of butter or oil and spread it thinly.
You do not want a pool of fat.
12. Cook the muffins
Carefully place the muffins into the skillet.
Leave enough space between them so you can flip them easily.
Cook for approximately 5–7 minutes on the first side.
The underside should become golden brown.
Flip gently.
Cook for another 5–7 minutes.
If they brown too quickly but feel soft in the center, reduce the heat to low.
The total cooking time is usually around 10–14 minutes per batch, depending on thickness and heat.
What should NOT happen: The outside should not become dark brown while the center remains doughy.
Low and slow is better than high and fast.
13. Check for doneness
The internal temperature should be approximately 93–96°C (200–205°F) when fully cooked.
If you do not have a thermometer, gently press the center.
It should feel springy rather than squishy.
If you are uncertain, cook one muffin a little longer and cut it open to check.
14. Cool briefly
Transfer the cooked muffins to a cooling rack.
Allow them to cool for at least 10–15 minutes.
They continue to set as they cool.
Do not stack them while hot because trapped steam can soften the crust.
15. Split with a fork
This is important.
Do not use a knife if you want classic nooks and crannies.
Insert a fork around the edge and gently work your way around the muffin.
Pull it apart.
The inside should reveal a soft, airy network of small holes.
That is exactly what you want.
Chef-Level Tips for Better Nooks and Crannies
Do not over-knead
The dough needs enough gluten development to hold its shape, but excessive kneading can make it too tight.
Do not add too much flour
A dry dough usually produces dense English muffins.
Slight stickiness is normal.
Cook slowly
English muffins are thicker than tortillas or pancakes.
They need time for the center to cook.
Give the dough enough time to rise
Underproofed dough tends to produce dense muffins.
Use a heavy pan
A cast-iron skillet or heavy griddle distributes heat more evenly.
Avoid pressing the muffins
Once they are in the pan, leave them alone as much as possible.
Pressing them can flatten the air pockets.
CHEF’S TIP: If your muffins brown too quickly, reduce the heat rather than shortening the cooking time. The goal is a golden exterior and fully cooked center.
Common Problems and How to Fix Them
My English muffins are dense
The dough may not have risen enough.
Check the freshness of your yeast and give the dough more time in a warm environment.
The centers are raw
Your heat is probably too high.
Lower it and cook the muffins longer.
The muffins are too dry
You may have added too much flour.
Next time, hold back some of the flour and add only what is necessary.
The muffins have no nooks and crannies
Overworking the dough, underproofing, or aggressively rolling it can reduce the air pockets.
Handle the dough gently.
The outside is burnt
The skillet is too hot.
English muffins should cook slowly over medium-low to low heat.
The muffins are flat
They may have been overproofed or handled too roughly after rising.
Be gentle when moving them to the skillet.
Overnight English Muffins
Want fresh English muffins for breakfast without waking up at dawn?
Prepare the dough in the evening.
After kneading, place it in a lightly greased bowl, cover it, and refrigerate overnight.
The slow fermentation develops extra flavor.
The next morning:
- Let the dough sit at room temperature for approximately 20–30 minutes.
- Roll and cut the muffins.
- Let them rise for 30–45 minutes.
- Cook as directed.
This method is especially convenient for weekend brunch.
Variations and Customizations
Whole-Wheat English Muffins
Replace 120–150 g of the all-purpose flour with whole-wheat flour.
The muffins will have a nuttier flavor and more fiber.
You may need a little extra water because whole-wheat flour absorbs more liquid.
Cinnamon Raisin English Muffins
Add:
- 1 teaspoon ground cinnamon
- 100 g raisins
Fold the raisins in during the final stage of kneading.
These are excellent toasted with butter.
Blueberry English Muffins
Add dried blueberries instead of raisins.
A little lemon zest also works beautifully.
Cheddar Herb English Muffins
Add:
- 75 g shredded cheddar
- 1 teaspoon dried herbs
These are fantastic with scrambled eggs.
Sourdough English Muffins
Use active sourdough starter in place of some of the yeast and adjust the flour and liquid accordingly.
Sourdough gives the muffins a deeper flavor and gentle tang.
Garlic and Herb English Muffins
Add a small amount of garlic powder, dried parsley, and oregano.
Serve them alongside soup or pasta.
How to Store Homemade English Muffins
Room Temperature
Once completely cool, store English muffins in an airtight bag or container.
They are best within 2–3 days.
Do not refrigerate unless necessary because refrigeration can make bread stale faster.
Refrigerator
If your kitchen is very warm, you can refrigerate them for approximately 5 days in a tightly sealed container.
Toast before serving.
Freezer
English muffins freeze beautifully.
Wrap each muffin individually or place them in a freezer-safe bag.
Freeze for up to 3 months for the best quality.
You can split them before freezing so they are ready to toast.
How to Reheat English Muffins
Toaster
The toaster is the easiest option.
Toast until the edges are crisp and the center is warm.
Oven
Heat at 180°C (350°F) for approximately 5–8 minutes.
From Frozen
Place frozen English muffin halves directly into the toaster.
You may need two cycles depending on your toaster.
What to Serve With Homemade English Muffins
There are so many possibilities.
Sweet Toppings
- Butter and honey
- Strawberry jam
- Raspberry jam
- Blueberry preserves
- Peanut butter
- Almond butter
- Cream cheese
- Nutella
- Cinnamon sugar
Savory Toppings
- Fried eggs
- Scrambled eggs
- Avocado
- Smoked salmon
- Ham and cheese
- Turkey and cheddar
- Tuna salad
- Egg salad
Breakfast Sandwich
Toast the muffin.
Add:
- One fried egg
- A slice of cheddar
- Crispy bacon or turkey
- Fresh tomato
- A little hot sauce
Close the sandwich and serve immediately.
The toasted muffin soaks up the egg yolk and melted cheese beautifully.
English Muffins for Eggs Benedict
Homemade English muffins are perfect for Eggs Benedict.
Split and toast them.
Top with:
- Canadian bacon or ham
- A poached egg
- Hollandaise sauce
- Fresh black pepper
- Chopped chives
The homemade muffin provides a sturdy, crisp base that holds the creamy hollandaise beautifully.
Frequently Asked Questions
Are homemade English muffins difficult to make?
No. The dough is fairly simple, but it does require patience during the rising stages. The most important thing is cooking them slowly enough so the centers cook completely.
Can I make English muffins without an oven?
Yes. English muffins are traditionally cooked on a griddle or skillet, so you can make them entirely on the stovetop.
Why do English muffins have holes?
The holes, or nooks and crannies, are created by air bubbles in the yeast dough during fermentation and cooking. They make the muffins excellent at holding melted butter, jam, and sauces.
Should I split English muffins with a fork?
Yes. Fork-splitting creates a rough, irregular interior with more nooks and crannies. Cutting with a knife gives a smoother surface.
Why are my English muffins raw in the middle?
The skillet was likely too hot. The exterior browned before the heat had time to cook the center. Lower the temperature and cook more slowly.
Can I freeze homemade English muffins?
Absolutely. They freeze very well for up to approximately three months. Split them first and store them in an airtight freezer bag.
Can I make the dough the night before?
Yes. An overnight rise in the refrigerator is an excellent way to develop flavor and make breakfast preparation easier.
Final Thoughts
Making homemade English muffins is one of those kitchen projects that feels much more rewarding than the effort suggests.
The ingredients are simple.
The technique is approachable.
And the payoff is enormous.
You get warm, golden muffins with soft centers, crisp edges, and those beautiful little nooks and crannies that seem to have been designed specifically for melting butter.
The first time you pull one apart with a fork and see that airy interior, you will understand why homemade bread is so special.
Serve them warm with butter and jam on a quiet weekend morning.
Turn them into breakfast sandwiches on a busy weekday.
Use them for Eggs Benedict when you want brunch to feel extra special.
Or simply toast one in the afternoon and spread it with peanut butter.
Once you have a batch in the freezer, you always have the makings of a delicious breakfast waiting for you.
If you try these homemade English muffins, leave a comment and tell me how they turned out. Did you make them classic, whole-wheat, cinnamon raisin, or cheesy and savory? Share this recipe with someone who loves homemade bread, and save it for your next weekend baking project.
There is nothing quite like the smell of homemade bread in the kitchen—and these little golden muffins are absolutely worth making from scratch.