Crispy Fried Halloumi Cheese Bites
A Golden, Salty, Irresistible Snack You’ll Want to Make Again and Again
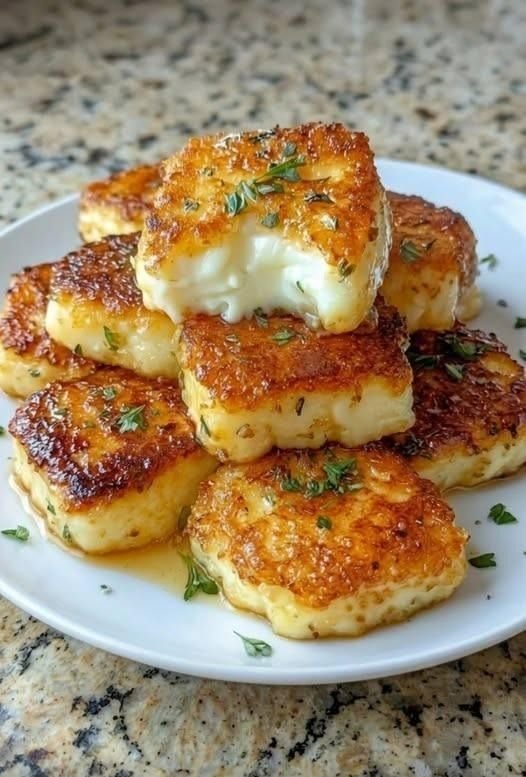
There’s something magical about the sound of cheese sizzling in a hot pan. The moment those little cubes of halloumi hit the oil, they begin transforming into golden, crispy bites of pure joy.
I still remember the first time I tried fried halloumi at a cozy café. The plate arrived piled high with small golden cubes, lightly crisped on the outside and soft and chewy on the inside. The aroma was irresistible — salty, buttery, and slightly nutty. One bite in, and I was hooked forever.
Halloumi is unlike most cheeses. Instead of melting into a puddle, it holds its shape beautifully when cooked. When fried, the outside forms a crunchy crust while the inside stays tender and pleasantly squeaky.
Dip it in a little honey, drizzle it with lemon, or toss it with herbs — however you serve it, fried halloumi cheese bites are addictive in the best possible way.
Whether you’re preparing a quick snack, a party appetizer, or a Mediterranean-inspired side dish, this recipe will quickly become a favorite in your kitchen.
Why You’ll Love This Recipe
Here are a few reasons this dish deserves a permanent spot in your recipe collection:
-
Super quick recipe – ready in under 15 minutes
-
Minimal ingredients – simple pantry staples
-
Budget-friendly – one block of cheese feeds several people
-
Naturally gluten-free option
-
High in protein
-
Perfect party appetizer
-
Kid-friendly snack
-
Crispy outside, chewy inside texture
-
Pairs with sweet, savory, or spicy dips
Best of all, it feels fancy enough for guests but is incredibly easy to make at home.
Ingredients (With Exact Measurements)
This recipe makes 4 servings.
Main Ingredients
-
250 g halloumi cheese (9 oz)
-
2 tbsp all-purpose flour (16 g / 0.5 oz)
-
½ tsp black pepper
-
½ tsp paprika (optional)
-
2 tbsp olive oil (30 ml)
-
1 tsp lemon juice (optional garnish)
Optional Garnishes
-
1 tbsp honey (21 g)
-
1 tbsp chopped parsley
-
chili flakes to taste
Healthy Substitutes
-
Gluten-free option: Use rice flour or cornstarch instead of all-purpose flour
-
Lower-fat option: Air fry instead of pan-frying
-
Extra flavor: Use garlic powder or smoked paprika in the coating
-
Dairy alternative: Halloumi is unique, but paneer can work as a substitute (texture will differ)
Nutritional Information (Per Serving)
Approximate values for one serving.
| Nutrient | Amount |
|---|---|
| Calories | 210 kcal |
| Protein | 13 g |
| Carbohydrates | 4 g |
| Fats | 16 g |
| Fiber | 0.3 g |
Vitamins & Minerals
Halloumi contains:
-
Calcium
-
Vitamin A
-
Vitamin B12
-
Phosphorus
Diet Notes
✔ Gluten-free (if coated with cornstarch)
✔ Keto-friendly
✔ Vegetarian
✖ Not vegan
✖ Not dairy-free
Kitchen Tools Needed
You don’t need fancy equipment for this recipe.
Essential tools include:
-
Sharp knife
-
Cutting board
-
Mixing bowl
-
Nonstick frying pan or skillet
-
Tongs or spatula
-
Paper towels
-
Plate for serving
Optional tools:
-
Air fryer
-
Small dipping bowls for sauces
Step-by-Step Preparation (Detailed)
Total Time: 10–12 minutes
Prep Time: 5 minutes
Cook Time: 5–7 minutes
Step 1: Prepare the Halloumi
Remove the halloumi from its packaging and pat it dry with paper towels.
Cut the cheese into bite-sized cubes (about 1 inch / 2.5 cm each).
Pro Tip:
Drying the cheese helps it crisp better when frying.
Step 2: Coat the Cheese
In a bowl, combine:
-
flour
-
black pepper
-
paprika
Toss the halloumi cubes in the mixture until lightly coated.
The coating should be thin — just enough to create a crispy crust.
Step 3: Heat the Pan
Place a nonstick skillet over medium-high heat.
Add 2 tablespoons olive oil and allow it to heat for about 30 seconds.
You’ll know the oil is ready when it shimmers slightly.
Step 4: Fry the Halloumi
Place the coated cubes into the pan in a single layer.
Fry for 1–2 minutes per side.
Turn each cube using tongs until all sides are golden brown and crispy.
You should hear a gentle sizzling sound.
Texture cue:
The surface should look golden and slightly blistered.
Step 5: Drain Excess Oil
Transfer the fried halloumi onto a plate lined with paper towels.
Let them rest for 30 seconds.
This removes excess oil while keeping them crispy.
Step 6: Add Final Touches
Serve immediately with:
-
drizzle of honey
-
squeeze of lemon juice
-
sprinkle of parsley
-
pinch of chili flakes
Hot halloumi tastes best right after frying.
Expert Cooking Tips & Mistakes to Avoid
Even simple recipes have secrets that make them perfect.
1. Don’t overcrowd the pan
Too many pieces at once lowers the temperature.
Result: soggy cheese instead of crispy.
Cook in batches if needed.
2. Use medium-high heat
Low heat = cheese becomes rubbery
High heat = coating burns quickly
Medium-high is ideal.
3. Don’t fry too long
Halloumi should cook just until golden.
Overcooking makes it tough.
4. Skip extra salt
Halloumi is naturally salty.
Adding salt can make it overwhelming.
5. Eat it fresh
Halloumi tastes best within minutes of cooking.
Variations & Customizations
One of the best things about this recipe is how customizable it is.
Spicy Version
Add heat for spice lovers.
Mix into the flour:
-
½ tsp chili powder
-
½ tsp cayenne pepper
-
½ tsp garlic powder
Serve with spicy mayo or chili sauce.
Healthy Version
For a lighter option:
-
Skip flour coating
-
Use air fryer
Air fry at 200°C (390°F) for 8 minutes, shaking halfway.
You’ll still get crispy edges with less oil.
Kids-Friendly Version
Make it milder and fun.
-
Skip paprika and chili
-
Cut cheese into smaller cubes
Serve with:
-
ketchup
-
honey mustard
-
yogurt dip
Kids love the crispy outside and cheesy inside.
Storage & Reheating Instructions
Although best fresh, leftovers can still be enjoyed.
Fridge Storage
Store in an airtight container.
Shelf life: 3 days.
Freezer Storage
Fried halloumi can be frozen.
-
Cool completely
-
Store in freezer-safe bag
Shelf life: 1 month.
Best Reheating Method
Avoid microwaving if possible.
Best options:
Air Fryer:
180°C (350°F) for 3–4 minutes
Oven:
190°C (375°F) for 6 minutes
This restores the crispiness.
Serving Suggestions
These crispy bites pair beautifully with many foods.
Serve with Dips
-
garlic yogurt sauce
-
tzatziki
-
honey mustard
-
sweet chili sauce
Serve with Meals
They pair well with:
-
Mediterranean salads
-
grilled vegetables
-
roasted potatoes
-
pita bread
Party Appetizer Idea
Place them on a platter with:
-
olives
-
cherry tomatoes
-
hummus
-
cucumber slices
Instant Mediterranean snack board.
Frequently Asked Questions (FAQs)
1. Does halloumi melt when fried?
No. Halloumi has a high melting point, so it softens but keeps its shape, making it perfect for frying.
2. Can I make fried halloumi without flour?
Yes. You can fry it plain for a slightly softer texture.
Flour simply adds extra crispiness.
3. Can I cook halloumi in an air fryer?
Yes.
Air fry at 200°C (390°F) for about 8 minutes, flipping halfway.
4. Why is my halloumi rubbery?
This usually happens when it is overcooked.
Cook only until golden.
5. Can I grill halloumi instead?
Absolutely.
Grill slices for 2 minutes per side until charred and golden.
6. What sauces go best with fried halloumi?
Popular options include:
-
honey
-
tzatziki
-
chili sauce
-
garlic yogurt dip
Final
If you’ve never tried fried halloumi cheese bites, you’re in for a delicious surprise. Crispy, salty, and incredibly satisfying, they’re one of the easiest appetizers you can make in under 15 minutes.
Give this recipe a try tonight and experience that irresistible golden crunch for yourself.
If you loved it:
⭐ Leave a comment with your favorite dipping sauce
📌 Share this recipe with friends
📷 Tag your creation on social media
And remember — once you start making fried halloumi, it’s almost impossible to stop! 🧀✨