Light and Heavenly Cream Cheese Cake
A dreamy, cloud-soft dessert that melts in your mouth
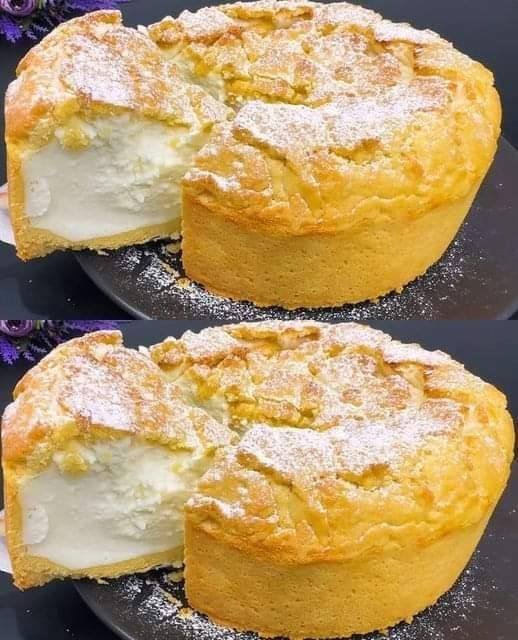
There’s something magical about the moment a freshly baked cream cheese cake comes out of the oven. The kitchen fills with a warm, buttery aroma, and the golden top gently jiggles like a soft pillow of sweetness. You slice into it, and the knife glides through effortlessly, revealing a delicate, creamy interior that feels almost like eating a cloud.
I remember the first time I made this light and heavenly cream cheese cake for a small family gathering. Everyone expected the classic dense cheesecake — rich, heavy, and indulgent. But the moment they took a bite, their eyes widened.
“Wait… this is cheesecake?” someone asked.
It was lighter. Fluffier. Silky smooth. Almost like a cross between a cheesecake and a soufflé.
That’s the beauty of this recipe. It delivers the luxurious creaminess of cheesecake but with an airy texture that makes every bite feel delicate and satisfying instead of overwhelming.
Whether you’re baking for a weekend treat, a celebration, or simply because you’re craving something sweet and comforting, this cake has a way of making ordinary moments feel special.
Let’s bake something unforgettable.
Why You’ll Love This Recipe
This Light and Heavenly Cream Cheese Cake quickly becomes a favorite for so many reasons:
-
Incredibly light texture – softer and fluffier than traditional cheesecake
-
Simple ingredients – no fancy ingredients required
-
Beginner-friendly – easy technique with clear steps
-
Budget-friendly dessert – affordable pantry staples
-
Not overly sweet – perfectly balanced flavor
-
Perfect for celebrations – elegant yet effortless
-
Customizable – easily adapted with fruits, chocolate, or citrus
-
Kid-friendly – soft, creamy, and delicious for all ages
And the best part? It looks like a bakery-quality dessert, but it’s made right in your own kitchen.
Ingredients (With Exact Measurements)
Here’s everything you’ll need to create this cloud-like dessert.
Main Ingredients
-
Cream cheese (softened) – 250 g | 1 cup | 8.8 oz
-
Granulated sugar – 100 g | ½ cup | 3.5 oz
-
Milk – 120 ml | ½ cup | 4 oz
-
Unsalted butter (melted) – 50 g | 3 tbsp | 1.8 oz
-
Eggs (separated) – 3 large
-
Cake flour – 60 g | ½ cup | 2 oz
-
Cornstarch – 20 g | 2 tbsp | 0.7 oz
-
Vanilla extract – 1 tsp
-
Lemon juice – 1 tbsp
-
Salt – ¼ tsp
-
Cream of tartar (optional) – ¼ tsp
Healthy Substitutes
If you’d like a healthier twist, try these swaps:
-
Low-fat cream cheese instead of full-fat
-
Honey or maple syrup instead of granulated sugar
-
Almond flour instead of cake flour (gluten-free option)
-
Coconut milk instead of dairy milk
-
Greek yogurt (¼ cup) to replace part of the cream cheese
Nutritional Information (Per Serving)
(Based on 8 servings)
-
Calories: ~210 kcal
-
Protein: 6 g
-
Carbohydrates: 18 g
-
Fats: 13 g
-
Fiber: 0.5 g
Vitamins & Minerals
-
Calcium
-
Vitamin A
-
Vitamin B12
-
Phosphorus
Dietary Notes
-
❌ Not vegan
-
❌ Not keto (moderate carbs)
-
✔ Can be gluten-free with almond or GF flour
-
✔ Vegetarian-friendly
Kitchen Tools Needed
Having the right tools makes the process smooth and enjoyable.
Essential tools:
-
Mixing bowls (2 large)
-
Electric hand mixer or stand mixer
-
Spatula
-
Whisk
-
7–8 inch cake pan
-
Baking tray (for water bath)
-
Parchment paper
-
Fine mesh sieve
-
Oven
Optional but helpful:
-
Kitchen scale
-
Offset spatula
-
Cooling rack
Step-by-Step Preparation (Detailed)
Follow these simple steps for the perfect airy cream cheese cake.
Step 1: Preheat the Oven
Preheat your oven to 160°C (320°F).
Prepare a water bath by placing a baking tray filled halfway with hot water in the oven.
Pro Tip: The water bath keeps the cake moist and prevents cracks.
Step 2: Prepare the Cake Pan
Line a 7–8 inch round cake pan with parchment paper.
Lightly grease the sides with butter.
Wrap the outside of the pan with foil to prevent water from leaking in.
Step 3: Melt Cream Cheese Mixture
In a heatproof bowl over simmering water:
Add:
-
Cream cheese
-
Milk
-
Butter
Stir until smooth and silky.
Remove from heat and let cool slightly.
Step 4: Add Egg Yolks & Flavor
Whisk in:
-
Egg yolks
-
Vanilla extract
-
Lemon juice
Mix until smooth.
Step 5: Add Dry Ingredients
Sift together:
-
Cake flour
-
Cornstarch
-
Salt
Fold them gently into the batter.
Your mixture should be smooth, thick, and lump-free.
Step 6: Whip Egg Whites
In a clean bowl:
Beat egg whites on medium speed.
Add cream of tartar.
Gradually add sugar and continue beating until soft peaks form.
Texture cue: The peaks should gently fold over when lifted.
Step 7: Fold the Batter
Add ⅓ of the egg whites to the cream cheese mixture and mix gently.
Then fold in the remaining whites carefully using a spatula.
Do not overmix — this keeps the cake fluffy.
Step 8: Pour and Bake
Pour the batter into the prepared pan.
Tap lightly to remove air bubbles.
Place the cake pan into the water bath tray.
Bake at 160°C (320°F) for 55–65 minutes.
Step 9: Cooling Process
Once baked:
Turn off the oven.
Leave the cake inside for 15 minutes with the door slightly open.
This prevents collapsing.
Step 10: Chill Before Serving
Remove the cake and let it cool completely.
Refrigerate for 2–3 hours before slicing.
This step enhances the texture and flavor.
Expert Cooking Tips & Mistakes to Avoid
1. Don’t Overbeat Egg Whites
Stiff peaks make the cake dense. Aim for soft peaks.
2. Use Room Temperature Ingredients
Cold cream cheese causes lumps.
3. Always Use a Water Bath
Skipping it can cause cracks or uneven baking.
4. Fold Gently
Aggressive mixing deflates the batter.
5. Avoid Overbaking
The center should still have a slight jiggle.
Variations & Customizations
One of the best things about this recipe is how flexible it is.
Chocolate Version
Add:
-
2 tbsp cocoa powder
-
50 g melted dark chocolate
This creates a light chocolate cheesecake.
Healthy Version
-
Use low-fat cream cheese
-
Replace sugar with stevia or monk fruit sweetener
-
Use almond flour
Result: Lower carbs and calories.
Kids-Friendly Version
Kids love colorful desserts.
Try adding:
-
Strawberry puree swirl
-
Chocolate chips
-
Rainbow sprinkles
You can even serve it with whipped cream.
Citrus Version
Add:
-
Orange zest
-
Lime zest
-
Extra lemon juice
This makes the cake bright and refreshing.
Storage & Reheating Instructions
Proper storage keeps your cake fresh and delicious.
Refrigerator
Store in an airtight container.
Shelf life:
3–4 days.
Freezer
Wrap slices tightly in plastic wrap.
Store in a freezer-safe container.
Shelf life:
Up to 2 months.
Thawing Method
Transfer frozen slices to the fridge overnight.
Avoid microwaving — it can ruin the texture.
Serving Suggestions
This cake is delicious on its own, but pairing it makes it even better.
Serve with:
-
Fresh strawberries
-
Blueberry compote
-
Raspberry sauce
-
Whipped cream
-
Powdered sugar dusting
Perfect beverages:
-
Coffee
-
Cappuccino
-
Earl Grey tea
-
Green tea
-
Fresh berry smoothie
It also makes an elegant dessert for:
-
Birthdays
-
Afternoon tea
-
Dinner parties
-
Holiday gatherings
FAQs
1. Why did my cream cheese cake collapse?
This usually happens when the oven door is opened too early or the egg whites were overmixed.
2. Can I make this cake without a water bath?
Yes, but the texture may be slightly denser and cracks may form.
3. Can I use all-purpose flour instead of cake flour?
Yes. Replace with ½ cup all-purpose flour minus 1 tbsp.
4. Why is my cake too dense?
Possible reasons:
-
Egg whites overmixed
-
Batter overfolded
-
Oven temperature too low
5. Can I make this cake ahead of time?
Absolutely. It actually tastes better the next day.
6. Can I add fruit inside the batter?
Yes! Blueberries, raspberries, or diced strawberries work beautifully.
7. How do I get clean slices?
Use a warm knife, wiping it clean between cuts.
Final
There’s something truly special about baking a dessert that feels both luxurious and comforting at the same time. This Light and Heavenly Cream Cheese Cake is one of those recipes that surprises everyone who tastes it — soft, creamy, delicate, and unforgettable.
If you try this recipe, I’d love to hear about it!
Leave a comment below and tell me:
-
Did you try any variations?
-
What toppings did you add?
-
How did your cake turn out?
And don’t forget to share this recipe with friends and family — because desserts this good deserve to be enjoyed together.
Happy baking! 🍰✨