Magic Mascarpone Cake in Three Perfect Layers
A mesmerizing dessert that transforms from a single batter into three divine textures
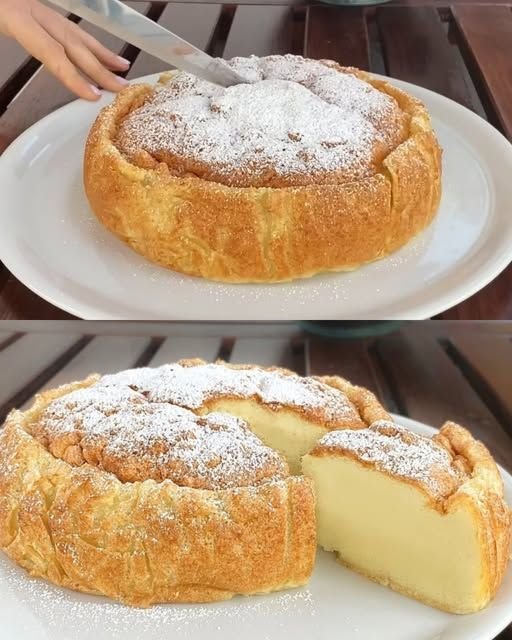
Have you ever witnessed magic in the kitchen? I don’t mean abracadabra, smoke, or flashy tricks. I mean the kind of magic where one simple batter transforms itself into three distinct layers — a dense custard base, a soft creamy middle, and a delicate sponge top — right in the oven.
That’s exactly what happens with this Magic Mascarpone Cake. The moment you open your oven, the aroma of vanilla and lightly sweetened mascarpone fills the air. Your eyes widen as you peek inside and see the layers forming almost like a dessert in slow motion. And then comes the first bite — silky, creamy, and airy all at once. Each forkful is a different sensation, yet perfectly harmonious.
I first baked this for a small weekend brunch. I was skeptical, thinking: “Can a single batter really create three layers?” But as it cooled on the counter, my doubts melted away — literally. The family couldn’t stop taking slices, each exclaiming, “This tastes like a fancy bakery cake!” But the secret? It was made entirely in my little home kitchen, with just simple, wholesome ingredients.
Why You’ll Love This Recipe
This cake isn’t just a showstopper — it’s practical, too. Here’s why you’ll adore it:
-
One batter, three layers — looks complicated but super easy to make
-
Elegant presentation — perfect for brunch, dinner parties, or birthdays
-
Rich yet light — creamy mascarpone without feeling overly heavy
-
Kid-approved — soft sponge and custard middle is irresistible
-
Customizable — swirl in chocolate, coffee, or citrus for extra flair
-
Minimal ingredients — pantry-friendly and budget-conscious
-
Versatile dietary options — can be gluten-free with almond flour
Ingredients (With Exact Measurements)
Main Ingredients
-
Mascarpone cheese – 250 g | 1 cup | 8.8 oz
-
Granulated sugar – 100 g | ½ cup | 3.5 oz
-
Eggs (separated) – 4 large
-
Whole milk – 120 ml | ½ cup | 4 oz
-
Vanilla extract – 2 tsp
-
Cake flour – 60 g | ½ cup | 2 oz
-
Cornstarch – 15 g | 2 tbsp | 0.5 oz
-
Lemon zest (optional) – 1 tsp
-
Salt – ¼ tsp
Healthy or Custom Substitutes
-
Low-fat mascarpone instead of full-fat
-
Honey or maple syrup in place of sugar
-
Almond flour instead of cake flour for gluten-free option
-
Oat milk or coconut milk instead of dairy milk
Nutritional Information (Per Serving – 8 Servings)
-
Calories: ~240 kcal
-
Protein: 7 g
-
Carbohydrates: 20 g
-
Fats: 15 g
-
Fiber: 0.5 g
Vitamins & Minerals: Calcium, Vitamin A, Vitamin B12, Phosphorus
Dietary Notes:
-
❌ Not vegan
-
✔ Vegetarian
-
✔ Can be made gluten-free
Kitchen Tools Needed
-
2 Mixing bowls
-
Electric mixer or whisk
-
Spatula
-
8-inch round cake pan
-
Baking tray (for water bath)
-
Parchment paper
-
Fine sieve
-
Cooling rack
Optional: Offset spatula, kitchen scale
Step-by-Step Preparation (Detailed)
Step 1: Preheat Oven & Prepare Pan
-
Preheat oven to 160°C (320°F).
-
Line an 8-inch round cake pan with parchment paper and lightly grease.
-
Wrap the outside with foil to prevent water leaks.
Step 2: Mix Mascarpone Base
-
In a bowl, blend mascarpone, egg yolks, milk, sugar, vanilla, and lemon zest until smooth.
-
Sift in cake flour, cornstarch, and salt. Fold gently to create a lump-free batter.
Step 3: Whip Egg Whites
-
In a clean bowl, beat egg whites until soft peaks form.
-
Gradually add 1–2 tbsp sugar while beating to stabilize.
Tip: Soft peaks give airy layers; overwhipped whites make the cake too dense.
Step 4: Fold Egg Whites Into Batter
-
Fold ⅓ of the egg whites into the mascarpone batter to lighten it.
-
Gently fold in the remaining whites using a spatula.
Step 5: Bake in Water Bath
-
Pour batter into pan and tap to release air bubbles.
-
Place pan in a baking tray with hot water halfway up the sides.
-
Bake 55–65 minutes at 160°C (320°F).
Texture cue: Cake should jiggle slightly in the center when done.
Step 6: Cool Gradually
-
Turn off oven and open door slightly. Let cake sit 10–15 minutes to prevent collapsing.
-
Remove from oven, cool completely on a rack, then refrigerate for 2–3 hours.
Expert Cooking Tips & Mistakes to Avoid
-
Water bath is essential for custard-like middle.
-
Don’t overmix egg whites or batter — preserves airy layers.
-
Use room-temperature mascarpone to prevent lumps.
-
Avoid opening oven early — can collapse the layers.
-
Clean folding technique ensures distinct layers.
Variations & Customizations
Chocolate Layer Twist
-
Add 1–2 tbsp cocoa powder or melted chocolate to ⅓ of batter before folding.
Citrus & Berry Magic
-
Add orange zest or lemon zest for brightness.
-
Serve with fresh berries or fruit coulis.
Coffee Lovers
-
Fold in 1 tsp instant coffee into mascarpone base.
-
Garnish with cocoa powder or espresso drizzle.
Kid-Friendly Version
-
Add mini chocolate chips to the top layer.
-
Serve with a dollop of whipped cream.
Storage & Reheating Instructions
Refrigerator: 3–4 days in an airtight container
Freezer: Up to 2 months; slice first, wrap in plastic
Thawing: Overnight in fridge; avoid microwaving to preserve layers
Serving Suggestions
-
Dust with powdered sugar for elegance
-
Serve with whipped cream or fruit coulis
-
Pairs well with cappuccino, Earl Grey, or green tea
-
Perfect for brunch, dinner parties, or festive gatherings
FAQs
-
Why didn’t my layers separate?
-
Likely overmixing or too short baking time.
-
-
Can I make it gluten-free?
-
Yes, use almond or gluten-free flour.
-
-
Can I freeze the whole cake?
-
Yes, but slice first for easier thawing.
-
-
How do I avoid cracks on top?
-
Water bath and gentle cooling prevent cracks.
-
-
Why is the top layer too firm?
-
Slightly overbaked; reduce time by 5–10 minutes next time.
-
-
Can I add fruit inside the batter?
-
Yes, small berries fold nicely without weighing layers down.
-
This Magic Mascarpone Cake is one of those desserts that makes your kitchen feel like a bakery and your guests think you’re a pro pastry chef. The three distinct layers, silky texture, and melt-in-your-mouth flavor create a truly memorable experience.
Give it a try, and watch the magic happen before your eyes. Comment below to share your variations, toppings, or first reactions. And don’t forget to share this recipe — because desserts this enchanting deserve to be enjoyed by everyone!