How to Unclog Stove Vents and Instantly Brighten Your Flame (Simple Homemade Fix That Actually Works)
Fix weak gas stove flames fast. Learn a safe, effective homemade method to unclog burner vents and restore strong, even heat.
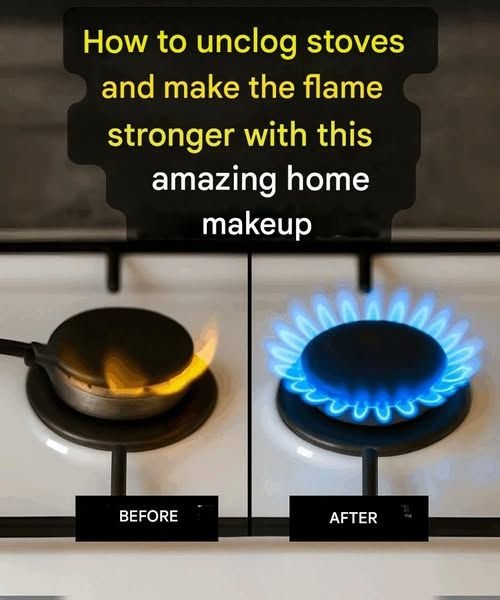
If your stove flame has turned weak, uneven, or that frustrating orange-yellow color, you’re not imagining things—something’s off.
Cooking takes longer. Heat feels inconsistent. And suddenly, even simple meals become annoying.
Here’s the surprising part: in most cases, your stove isn’t “going bad.” It’s just clogged.
Grease, food debris, and carbon buildup silently block your burner vents over time—and that’s exactly what kills your flame strength.
The good news? You don’t need expensive repairs or fancy tools.
There’s a simple homemade method that can restore a strong, clean blue flame—often in under 30 minutes.
Let’s walk through exactly how to do it safely, effectively, and without damaging your stove.
What Causes Weak or Uneven Stove Flames?
Before fixing it, it helps to understand what’s happening.
Gas stove burners rely on tiny holes (vents or ports) to release gas evenly. When these holes get blocked, gas flow becomes uneven.
That leads to:
- Low or weak flame
- Yellow/orange flame instead of blue
- Uneven heating
- Clicking sounds without ignition
- Gas smell (in severe cases)
The most common culprits?
- Grease buildup
- Food spills
- Dust and debris
- Moisture residue
Even a small blockage can throw everything off.
Why Flame Color Matters More Than You Think
A healthy gas flame should be blue.
That means efficient combustion.
When your flame turns yellow or orange:
- Gas isn’t burning properly
- Heat output drops
- Carbon buildup increases
- It may produce more soot
Over time, this doesn’t just affect cooking—it can also impact indoor air quality.
So fixing this isn’t just about convenience. It’s about safety and efficiency.
The Homemade Trick That Actually Works
You don’t need specialized cleaners.
This simple combo does the job:
What you’ll need:
- White vinegar
- Baking soda
- Warm water
- A toothbrush or soft brush
- A thin needle or safety pin
- Dry cloth
This method breaks down grease, loosens debris, and clears blocked vents safely.
Step-by-Step: How to Unclog Stove Vents
Step 1: Turn Off Gas Completely
This is non-negotiable.
- Turn off all burners
- Shut off gas supply if possible
- Let the stove cool fully
Safety first—always.
Step 2: Remove Burner Parts
Carefully take off:
- Grates
- Burner caps
- Burner heads
Lay them out in order so reassembly is easy.
Step 3: Soak in Vinegar Solution
Mix:
- 1 part white vinegar
- 1 part warm water
Let the parts soak for 15–20 minutes.
This helps dissolve grease and loosen stubborn residue.
Step 4: Apply Baking Soda Paste
Make a paste with:
- Baking soda + a little water
Apply it to:
- Burner heads
- Stubborn dirty areas
Let it sit for 5–10 minutes.
You’ll notice bubbling—that’s normal. It’s breaking down grime.
Step 5: Gently Scrub
Use a toothbrush to clean:
- Surface grime
- Edges
- Hard-to-reach spots
Avoid aggressive scrubbing—especially on coated surfaces.
Step 6: Clear the Burner Holes
This is the key step.
Use a thin needle or pin to gently unclog each hole.
- Don’t force it
- Just loosen debris
You’ll often see tiny particles come out—that’s what was blocking your flame.
Step 7: Rinse and Dry Completely
Rinse all parts with clean water.
Then:
- Wipe with a dry cloth
- Let air dry fully
Moisture can interfere with ignition, so don’t rush this.
Step 8: Reassemble and Test
Put everything back carefully.
Turn on the gas and ignite the burner.
If done correctly, you should see:
- Strong, steady blue flame
- Even heat distribution
- Faster cooking response
Real-Life Scenario: A Common Fix
Mark, a home cook in Texas, noticed his flame had turned orange and weak.
He assumed it was a gas issue.
After trying this method, he cleared out clogged burner holes—and within minutes, his flame returned to a strong blue.
No technician. No replacement parts.
Just buildup that needed clearing.
Common Mistakes That Make It Worse
1. Using toothpicks
They can break and get stuck inside holes.
2. Skipping drying time
Moisture can block ignition.
3. Scrubbing too hard
Can damage burner coating.
4. Ignoring the issue too long
Build-up gets harder to remove over time.
5. Using harsh chemicals
Can corrode parts and leave residue.
Pros & Cons of This Homemade Method
| Pros | Cons |
|---|---|
| Cheap and accessible | Requires some effort |
| Safe when done correctly | Not instant for heavy buildup |
| No special tools needed | Needs regular maintenance |
| Improves flame immediately | May not fix mechanical issues |
Advanced Tips for Better Stove Performance
- Clean burners once every 2–4 weeks if you cook often
- Wipe spills immediately before they harden
- Use a flame diffuser if cooking frequently with oils
- Keep kitchen ventilation strong to reduce grease buildup
When This Trick Won’t Be Enough
Sometimes, the issue goes beyond simple clogging.
Watch for:
- Persistent gas smell
- Ignition failure
- Clicking without flame
- Damaged burner parts
In those cases, it’s safer to contact a professional technician.
2026 Trend: Smarter Kitchen Maintenance
More homeowners are shifting toward:
- Preventive cleaning routines
- DIY maintenance over service calls
- Eco-friendly cleaning solutions
Simple habits like this one are replacing expensive fixes.
Frequently Asked Questions
1. Why is my stove flame orange instead of blue?
Usually due to clogged burner holes or incomplete combustion.
2. How often should I clean stove burners?
Every 2–4 weeks for regular use.
3. Can I use vinegar alone?
It helps, but works best combined with baking soda.
4. Is it safe to use a needle?
Yes, if done gently and carefully.
5. What if the flame is still weak after cleaning?
You may have a gas pressure or mechanical issue.
6. Can clogged vents be dangerous?
Yes, they can affect combustion and efficiency.
7. Should I remove burners every time?
For deep cleaning, yes.
8. Can grease cause ignition problems?
Absolutely—it blocks gas flow and disrupts sparking.
9. Is this method safe for all gas stoves?
Most standard gas stoves—check your manual if unsure.
10. How long does the process take?
Around 20–30 minutes total.
✅ Action Checklist
Do this:
- Turn off gas before cleaning
- Soak burners in vinegar solution
- Use baking soda for buildup
- Clear holes gently with a pin
- Dry everything completely
Avoid this:
- Using sharp force
- Skipping drying
- Using harsh chemicals
- Ignoring buildup
🏁 Conclusion
A weak stove flame doesn’t mean your appliance is failing—it usually means it needs attention.
This simple homemade method can bring your burners back to life, improve cooking performance, and even make your kitchen safer.
No expensive tools. No complicated steps.
Just a little effort—and a noticeable difference.
Clean burners = stronger flame, faster cooking, and fewer headaches.
If this worked for you, share it with someone dealing with a stubborn stove—and keep your kitchen running like it should.