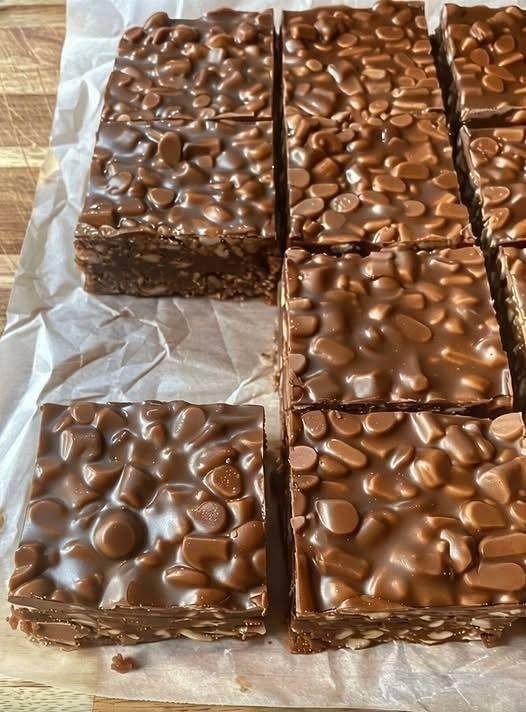
Rich, buttery, chocolatey, and packed with that irresistible crispy crunch — these homemade chocolate crunch bars are the kind of treat that disappears from the tray before you even realize it. Imagine snapping into a glossy layer of silky melted chocolate only to hear that satisfying crackle of crispy rice underneath. It’s nostalgic, comforting, and dangerously addictive in the best possible way. And the secret? They’re unbelievably easy to make with simple pantry ingredients.
There’s something magical about homemade desserts that instantly transport you back to childhood. Maybe it’s the smell of melted chocolate filling the kitchen, or the excitement of sneaking a bite before the bars fully set. These crunch bars bring all of that joy back — but with a richer flavor, better texture, and a homemade touch that store-bought candy bars simply can’t match.
Whether you need a quick no-bake dessert for a family gathering, a fun weekend baking project with kids, or a late-night chocolate fix, this recipe delivers every single time. Keep reading because I’ll show you exactly how to make them perfectly crunchy, glossy, and melt-in-your-mouth delicious — plus all the chef secrets to make them taste bakery-quality at home.
Why You’ll Love This Recipe
These homemade chocolate crunch bars are more than just dessert. They’re pure comfort wrapped in chocolate.
💛 Reasons You’ll Be Obsessed
- Quick & easy – Ready with minimal prep and no complicated baking techniques.
- Beginner-friendly – Perfect even if you’ve never made candy before.
- Budget-friendly – Uses affordable pantry staples.
- No-bake convenience – Great for hot days when you don’t want to turn on the oven.
- Ultra crunchy texture – That crispy snap is unbelievably satisfying.
- Perfect for parties – Easy to slice into bite-sized pieces for sharing.
- Customizable – Make them healthy, nutty, spicy, or extra indulgent.
- Kid-approved – Children absolutely love helping make these.
- Freezer-friendly – Make ahead for cravings anytime.
- Nostalgic comfort food – Tastes like childhood memories with a gourmet twist.
Pro Tip: These bars taste even better the next day because the chocolate flavor deepens overnight.
Creamy chocolate, crispy rice cereal, a touch of butter, and just the right sweetness come together to create the perfect homemade candy bar experience.
Meta Description
Learn how to make the ultimate homemade chocolate crunch bars with rich melted chocolate and crispy rice cereal. This easy no-bake recipe is crunchy, nostalgic, beginner-friendly, and perfect for parties, snacks, or chocolate cravings.
Ingredients (Exact Measurements + Pro Notes)
Main Ingredients
Semi-Sweet Chocolate – 400 g (14 oz / about 2 ⅓ cups chopped)
- The heart of the recipe.
- Use high-quality chocolate for the best flavor.
- Semi-sweet keeps the bars balanced and not overly sugary.
Substitution: Dark chocolate for a richer taste or milk chocolate for sweeter bars.
Crispy Rice Cereal – 120 g (4 cups)
- Creates that iconic crunchy texture.
- Light and airy, which keeps the bars from feeling too dense.
Important: Use fresh cereal for maximum crispiness.
Unsalted Butter – 60 g (4 tbsp / ¼ cup)
- Adds richness and a smooth melt-in-your-mouth finish.
Substitution: Coconut oil for a dairy-free version.
Peanut Butter – 80 g (⅓ cup)
- Adds creaminess and depth of flavor.
- Helps bind the mixture together beautifully.
Optional: Can be omitted if you prefer a pure chocolate flavor.
Vanilla Extract – 1 tsp
- Enhances the chocolate flavor and adds warmth.
Salt – ¼ tsp
- Balances sweetness and intensifies chocolate flavor.
Optional Add-Ins
Chopped Nuts – 50 g (⅓ cup)
Almonds, peanuts, hazelnuts, or pistachios add extra crunch.
Mini Marshmallows – ½ cup
Makes the bars extra fun and chewy.
Sea Salt Flakes
For a gourmet bakery-style finish.
Crushed Cookies
Oreos or digestive biscuits create an incredible layered texture.
Nutritional Information (Per Serving)
Based on 12 bars.
| Nutrient | Amount |
|---|---|
| Calories | 245 |
| Protein | 4 g |
| Carbohydrates | 24 g |
| Fat | 15 g |
| Fiber | 2 g |
| Sugar | 15 g |
| Calcium | 4% DV |
| Iron | 10% DV |
Dietary Notes
- Vegetarian: Yes
- Gluten-Free: Yes if using certified gluten-free cereal
- Dairy-Free: Possible with coconut oil and dairy-free chocolate
- Vegan: Use vegan chocolate and plant-based butter
- Keto-Friendly: Not in the standard version
- Weight-Loss Friendly: Best enjoyed as an indulgent treat in moderation
Did You Know? Dark chocolate contains antioxidants that may help support heart health when enjoyed in moderation.
Kitchen Tools Needed
Essential Tools
- Medium saucepan or microwave-safe bowl
- Silicone spatula
- Large mixing bowl
- 8×8-inch baking pan or tray
- Parchment paper
Optional Upgrades
- Offset spatula for perfectly smooth tops
- Kitchen scale for precise measurements
- Double boiler for gentler chocolate melting
No Double Boiler?
No problem. Simply microwave the chocolate in short 20-second bursts, stirring between each interval.
Step-by-Step Instructions
Step 1: Prepare Your Pan
Line an 8×8-inch baking pan with parchment paper.
Leave some paper hanging over the sides so you can easily lift the bars out later.
Pro Tip: Lightly grease the pan underneath the parchment so it stays in place.
Step 2: Melt the Chocolate Mixture
In a saucepan over low heat, combine:
- Chocolate
- Butter
- Peanut butter
Stir continuously for about 3–5 minutes until smooth and glossy.
Add vanilla extract and salt.
What You Should See
- Silky texture
- Shiny melted chocolate
- No lumps
What Should NOT Happen
- Burnt smell
- Grainy texture
- Thick clumps
If the chocolate becomes grainy, it likely overheated. Add 1 tablespoon warm milk or cream and stir gently to rescue it.
Step 3: Add the Crispy Rice Cereal
Pour the cereal into a large bowl.
Slowly pour the melted chocolate mixture over it.
Fold gently using a spatula until every piece is coated.
Important
Do not crush the cereal while mixing. Gentle folding keeps the crunch intact.
Step 4: Transfer to the Pan
Pour the mixture into your prepared pan.
Spread evenly using a spatula.
Press lightly — but not too firmly.
Why?
Over-pressing makes the bars hard instead of crispy.
Step 5: Add Toppings
Sprinkle with:
- Sea salt flakes
- Chopped nuts
- Crushed cookies
- Mini marshmallows
This step adds visual appeal and extra texture.
Step 6: Chill Until Firm
Place the pan in the refrigerator for 1–2 hours.
The bars are ready when:
- The chocolate feels firm
- The surface is no longer sticky
- The bars slice cleanly
Step 7: Slice & Serve
Lift the bars out using the parchment paper.
Cut into squares or rectangles using a sharp knife.
For clean cuts:
- Warm the knife under hot water
- Wipe dry between slices
And finally… enjoy that glorious crunch.
Chef-Level Tips & Mistakes to Avoid
1. Use Good Chocolate
Cheap chocolate can taste waxy and overly sweet.
Better chocolate = richer flavor and smoother texture.
2. Don’t Overheat the Chocolate
Chocolate burns surprisingly fast.
Always melt slowly over low heat.
3. Fresh Cereal Matters
Stale cereal loses crunch quickly.
Use a newly opened box if possible.
4. Chill Properly
Rushing the chilling process can make the bars messy and soft.
5. Add Texture Layers
Professional bakers often combine multiple textures:
- Crispy cereal
- Chopped nuts
- Flaky salt
- Cookie crumbs
This creates a more exciting bite.
Pro Tip: Add a thin drizzle of white chocolate on top for a bakery-style finish.
Variations & Customizations
🌶️ Spicy Chocolate Crunch Bars
Add:
- ¼ tsp cayenne pepper
- A pinch of cinnamon
The heat pairs beautifully with dark chocolate.
🥗 Healthy Version
Swap:
- Dark chocolate with low sugar
- Natural peanut butter
- Unsweetened puffed rice cereal
Add chia seeds or flaxseeds for extra nutrition.
👧 Kids-Friendly Version
Use milk chocolate and colorful sprinkles.
Mini marshmallows make them extra fun.
🍫 Restaurant-Style Gourmet Version
Use:
- 70% dark chocolate
- Toasted hazelnuts
- Sea salt flakes
- Gold leaf garnish
Fancy but surprisingly easy.
🌍 Fusion Twist
Mix in:
- Crushed pretzels
- Matcha powder
- Espresso powder
- Coconut flakes
You can completely reinvent the flavor profile.
Storage & Reheating Guide
Refrigerator Storage
Store in an airtight container for up to 7 days.
Keep layers separated with parchment paper.
Freezer Instructions
Freeze for up to 2 months.
Wrap tightly to prevent freezer burn.
To thaw:
- Leave at room temperature for 20–30 minutes.
Can You Reheat Them?
These bars are best enjoyed chilled or at room temperature.
However, if you want a softer texture:
- Microwave for 5–7 seconds
Do not overheat or the chocolate may melt too much.
How to Keep Them Crunchy
- Avoid humidity
- Store sealed tightly
- Keep away from warm sunlight
Serving Suggestions
These chocolate crunch bars are already incredible on their own, but pairing them with the right extras makes them unforgettable.
Best Drinks Pairings
- Cold milk
- Hot coffee
- Espresso
- Hot chocolate
- Vanilla milkshake
Delicious Side Pairings
- Fresh strawberries
- Vanilla ice cream
- Banana slices
- Whipped cream
Garnishing Ideas
- Chocolate drizzle
- Crushed pistachios
- Cocoa powder dusting
- Edible gold flakes
- Caramel swirl
Plating Tips
For an Instagram-worthy presentation:
- Stack bars slightly unevenly
- Add scattered crumbs nearby
- Use a wooden serving board
- Finish with flaky sea salt
The contrast makes them look bakery-professional instantly.
FAQs
1. Can I make chocolate crunch bars without peanut butter?
Absolutely. Simply omit it or replace it with almond butter, sunflower seed butter, or extra melted chocolate.
2. Why are my crunch bars too hard?
You may have pressed the mixture too firmly into the pan or overheated the chocolate.
3. Can I use milk chocolate instead of dark chocolate?
Yes. Milk chocolate creates sweeter, creamier bars that kids especially love.
4. How do I keep the cereal crispy?
Store the bars in an airtight container and avoid moisture exposure.
5. Can I make these bars vegan?
Yes. Use dairy-free chocolate and vegan butter or coconut oil.
6. Can I add protein powder?
Definitely. Mix 1–2 tablespoons into the melted chocolate mixture for a protein boost.
7. Do homemade crunch bars need refrigeration?
Yes, especially in warm climates. Refrigeration helps maintain their shape and texture.
Final Thoughts
There’s a reason homemade chocolate crunch bars never go out of style. They’re simple, nostalgic, incredibly satisfying, and packed with that magical crispy-chocolate combination everyone loves.
The best part? You don’t need fancy equipment or professional baking skills to make them. Just a few ingredients, a little stirring, and a bit of patience while they chill.
So go ahead — make a batch tonight. Share them with family, surprise your kids, or hide a few pieces for yourself in the fridge (you’ll thank yourself later).
And when you try them, don’t forget to leave a comment and share your favorite variation. Did you add nuts? Marshmallows? A spicy twist?
I’d love to hear how your homemade chocolate crunch bars turned out. Happy snacking! 🍫✨