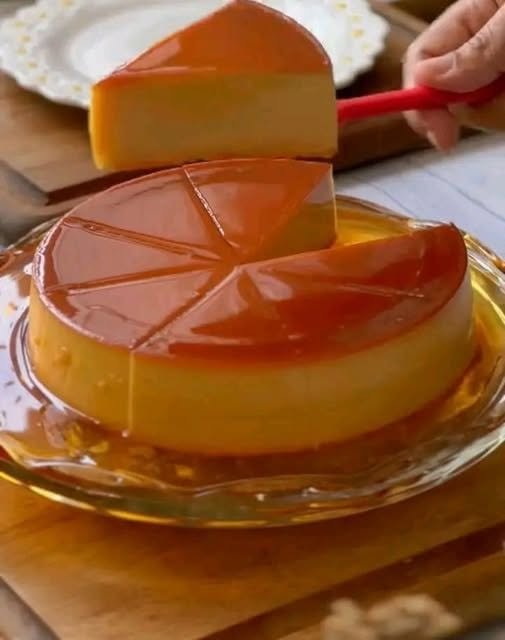
The Ultimate Silky Caramel Custard Pudding: Master the French Bistro Classic at Home
Velvety, smooth, and crowned with a pool of liquid amber caramel. Discover the foolproof secrets to making a bakery-quality caramel custard pudding in your own kitchen.
Master the classic caramel custard pudding (crème caramel). Learn the secrets to a silky-smooth custard, perfect liquid caramel, and zero bubbles.
The Allure of the Golden Spoon
There is a quiet, elegant drama to serving a classic caramel custard pudding—known globally as crème caramel or flan.
Imagine sliding a dessert knife around the edge of a small ramekin, inverting it onto a pretty porcelain plate, and watching it wobble with a delicate, gelatinous grace. As you lift the ceramic mold, a cascade of rich, glossy liquid caramel spills down the sides like liquid amber, pooling into a dark, buttery moat around a custard that looks as smooth as silk.
It is a dessert that feels intimidatingly sophisticated, conjuring images of sunlit Parisian cafes and high-end bistros. Yet, beneath its fancy facade, caramel custard pudding is made from some of the most humble, everyday staples in your pantry: eggs, milk, sugar, and a splash of vanilla.
If you have ever tried making flan or custard at home only to end up with a spongy, bubble-filled texture or a bitter, burnt sugar mess, take a deep breath. We are going to break down the physics of custard-making so you can nail it on your very first try.
The Two Pillars of Perfection
To make an extraordinary caramel custard, you only need to master two distinct chemical reactions:
-
The Caramelization of Sugar: Turning plain granulated sugar into a complex, nutty, deep amber syrup without letting it cross the line into bitter charcoal.
-
The Gentle Coagulation of Protein: Cooking eggs and dairy in a water bath (bain-marie) so the proteins firm up into a tender, unified gel rather than scrambling into a sweet omelet.
Let’s walk through the exact blueprint to conquer both.
Equipment Needed
-
4 to 6 oven-safe ramekins (6-oz capacity each)
-
A heavy-bottomed saucepan (for the caramel)
-
A large roasting pan or baking dish (for the water bath)
-
A fine-mesh strainer
-
Whisk and medium mixing bowl
Ingredients List
-
For the Caramel Sauce:
-
¾ cup granulated white sugar
-
3 tablespoons water
-
1 teaspoon fresh lemon juice (optional, but helps prevent the sugar from crystallizing)
-
-
For the Custard Base:
-
2 cups whole milk (whole milk is non-negotiable here; skim milk will yield a watery custard)
-
½ cup heavy cream (adds that luxurious, velvety mouthfeel)
-
⅓ cup granulated white sugar
-
3 large whole eggs
-
2 large egg yolks (extra yolks provide the classic rich color and smooth texture)
-
1 tablespoon pure vanilla extract (or 1 scraped vanilla bean)
-
A tiny pinch of salt (to balance the sweetness)
-
Step-by-Step Instructions
Step 1: Craft the Liquid Amber Caramel
-
Place your heavy-bottomed saucepan over medium heat. Add the granulated sugar, water, and lemon juice. Swirl the pan gently to moisten the sugar, but do not stir it with a spoon (stirring introduces air crystals and causes the sugar to seize up).
-
Let it cook undisturbed for 5 to 8 minutes. The syrup will come to a boil, bubble furiously, and eventually turn clear, then straw-yellow, and finally a deep golden-amber color (the hue of a new copper penny).
-
Watch it like a hawk during the final minute; caramel burns in a matter of seconds.
-
Immediately remove the pan from the heat and carefully pour the hot caramel evenly into the bottom of your 4 to 6 ramekins. Swirl each ramekin quickly so the caramel coats the bottom evenly. Set them aside to harden.
Step 2: Heat the Dairy Infusion
-
In a clean saucepan, combine the whole milk and heavy cream. Heat over medium-low until it is steaming hot, but do not let it come to a rolling boil.
-
Remove from the heat and stir in the pure vanilla extract.
Step 3: Whisk the Custard Base
-
In a medium mixing bowl, whisk together the whole eggs, extra egg yolks, granulated sugar, and a pinch of salt just until combined. You want to mix them thoroughly, but try not to whip excess air into the eggs (too many air bubbles equal a porous custard).
-
Temper the eggs: While whisking your egg mixture constantly, slowly pour a thin stream of the hot milk-and-cream mixture into the bowl. This gradual introduction warms the eggs gently without cooking them.
Step 4: Strain for Ultimate Silkiness
-
Pour the completed custard mixture through a fine-mesh strainer into a large measuring cup or pitcher.
-
This step catches any stray bits of cooked egg white or unblended chalazae, ensuring your final texture is glass-smooth. Let the mixture rest for 10 minutes so any surface foam dissipates.
Step 5: The Water Bath (Bain-Marie) Bake
-
Preheat your oven to 325°F (160°C).
-
Arrange your caramel-lined ramekins inside the large roasting pan.
-
Pour the strained custard mixture gently into each ramekin, filling them almost to the top.
-
Carefully pour boiling or very hot water into the roasting pan until it reaches about halfway up the sides of the ramekins. (The water bath insulates the delicate eggs, ensuring they cook evenly and gently).
-
Cover the roasting pan loosely with a sheet of aluminum foil to prevent the tops from browning too quickly.
-
Bake at 325°F for 35 to 45 minutes. You’ll know they are done when the edges are set, but the center still jiggles slightly like Jell-O when you nudge the pan.
Step 6: Chill, Unmold, and Serve
-
Remove the ramekins from the hot water bath and let them cool completely on a wire rack at room temperature.
-
Cover each ramekin with plastic wrap and place them in the refrigerator for at least 4 hours (overnight is even better). This chilling time allows the custard to set firmly.
-
To serve: Run a thin paring knife carefully around the inside edge of each ramekin to break the vacuum seal. Place a serving plate upside down over the top of the ramekin, and with a quick, confident flip, invert them together. Lift the ramekin slowly, and watch the glossy caramel cascade down!
Comparative Analysis: Crème Caramel vs. Crème Brûlée
People often confuse these two classic French custard desserts. Here is how they stack up:
Common Pitfalls and How to Fix Them
-
Pitfall 1: The “Spongy” or Porous Texture.
-
The Cause: Your oven temperature was too high, or you didn’t use a water bath, causing the eggs to overcook and separate.
-
The Fix: Keep your oven at a gentle 325°F, always use a hot water bath, and pull them out as soon as the center still has a slight wobble.
-
-
Pitfall 2: The Caramel Won’t Melt Out of the Ramekin.
-
The Cause: The caramel crystallized or hardened completely solid during refrigeration.
-
The Fix: Don’t panic! As the custard sits in the fridge overnight, the liquid caramel naturally draws moisture and softens back up. If you’re in a rush, dip the bottom of the ramekin in a bowl of warm water for 15 seconds before flipping.
-
-
Pitfall 3: Rubbery Skin on Top.
-
The Cause: The custard was baked uncovered, drying out the surface.
-
The Fix: Always tent your roasting pan with foil during the first half of the baking process.
-
Expert Insights: The Magic of Temperature Control
Professional pastry chefs understand that custard is essentially a delicate egg-protein matrix suspended in liquid. If you apply high, dry heat, the proteins squeeze together too tightly, pushing out the liquid and creating a curdled, scrambled texture.
By using a water bath (bain-marie), you surround the custard with a moist, even heat environment that never exceeds the boiling point of water. This gentle thermal cushion is the single greatest secret to achieving that melt-in-your-mouth, glass-like texture that separates amateur cooking from professional pastry arts.
Frequently Asked Questions
1. Can I make caramel custard pudding ahead of time? Yes, in fact, you should! Crème caramel tastes best when made a day in advance. It gives the custard time to set properly and allows the caramel flavor to permeate the outer layers of the pudding. It keeps brilliantly in the fridge for up to 3 days.
2. Why did my caramel turn grainy or crystallize? Crystallization happens when stray sugar crystals cling to the sides of the pan and chain-reaction the whole mixture. Adding a few drops of lemon juice or corn syrup to your sugar-water mix helps prevent this. Also, avoid stirring the sugar once it starts heating on the stove.
3. Do I have to use whole milk and heavy cream? For the best authentic texture, yes. Skim or low-fat milk contains too much water and not enough fat, resulting in a thin, watery custard that won’t hold its shape when inverted.
4. What if my custard is still completely liquid after 45 minutes? Your oven might run cooler than indicated. Check the internal temperature or leave it in for another 5 to 10 minutes, keeping a close eye on the jiggle.
5. Can I infuse the milk with other flavors? Absolutely! You can steep a cinnamon stick, cardamom pods, orange peel, or Earl Grey tea bags in the hot milk-and-cream mixture for 15 minutes before straining and mixing it with the eggs.
6. How do I get rid of air bubbles on top of the custard? Pouring the custard through a fine-mesh strainer catches most bubbles. If you still see foam on top of the ramekins right before baking, pass a kitchen torch quickly across the surface to pop them.
7. Can I bake this in one large dish instead of individual ramekins? You can, though it is traditionally baked in individual portions. If you use a single large baking dish (like a souffle dish), you will need to increase the baking time to roughly 55 to 65 minutes.
8. What should I do if my caramel burns? Throw it out and start over. Once caramel burns, it becomes intensely bitter and acrid, which will ruin the entire dessert. Fortunately, making a fresh batch of caramel takes less than 5 minutes!
Action Checklist
What to Do:
-
Use whole milk and heavy cream for a rich, authentic bistro texture.
-
Strain your custard base through a fine-mesh sieve to catch any clumps or foam.
-
Chill the custards for at least 4 hours (overnight is best) before attempting to invert them.
What to Avoid:
-
Stirring the sugar while it cooks on the stovetop, which triggers sugar crystallization.
-
Skipping the water bath; baking custards directly on an oven rack will curdle the eggs.
Mastering caramel custard pudding is a rite of passage for any home cook. With a little patience, precise temperature control, and a gentle water bath, you can turn basic kitchen staples into an unforgettable, silky-smooth masterpiece.