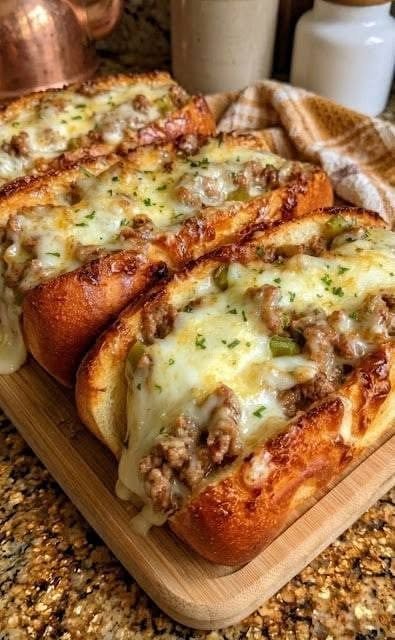
Cheesy Beef Hot Dog Buns
These homemade Cheesy Beef Hot Dog Buns are soft, fluffy, and loaded with juicy seasoned beef, melted cheese, and irresistible flavors. Perfect for breakfast, lunch, school snacks, game nights, parties, and family dinners, this easy recipe combines bakery-style buns with a delicious cheesy beef filling everyone will love.
The Comforting Bite That Brings Everyone Running to the Kitchen
There is a special kind of happiness that comes from warm bread fresh from the oven. The moment you open the kitchen door and smell buttery dough, melted cheese, and savory beef cooking together, it feels like a little celebration is happening at home.
Imagine biting into a soft golden bun. The outside is lightly toasted, the inside is fluffy, and then comes the surprise—juicy, seasoned beef wrapped in stretchy melted cheese. The flavors come together perfectly: rich, cheesy, slightly smoky, and wonderfully comforting.
That is exactly what makes Cheesy Beef Hot Dog Buns so addictive.
This recipe takes the classic hot dog idea and turns it into something even better. Instead of a simple sausage in a bun, you get a homemade-style bread filled with flavorful beef and gooey cheese. It is the kind of recipe that disappears quickly from the serving tray because everyone wants “just one more.”
Whether you are preparing a quick family meal, packing a school lunch, planning a weekend gathering, or looking for a delicious snack for movie night, these cheesy beef buns are guaranteed to become a favorite.
The best part? They look impressive, but they are surprisingly easy to make. With simple ingredients and a few professional tricks, you can create bakery-quality buns right in your own kitchen.
💛 Why You’ll Love This Recipe
- Quick and Easy: Simple steps make this recipe beginner-friendly.
- Perfect Comfort Food: Soft bread, savory beef, and melted cheese create the ultimate satisfying meal.
- Budget-Friendly: Uses affordable pantry ingredients and simple fillings.
- Beginner-Friendly: No advanced baking skills required.
- Family Favorite: Loved by kids and adults.
- Perfect for Any Occasion: Great for breakfast, lunch, dinner, Ramadan iftar, picnics, parties, school snacks, and game nights.
- Make-Ahead Friendly: Prepare the filling ahead and bake whenever needed.
- Customizable: Add vegetables, spices, or different cheeses to create your own version.
- Better Than Store-Bought: Fresh homemade buns have unbeatable softness and flavor.
- Emotionally Comforting: A warm, cheesy meal that feels like home.
💡 Pro Tip: The secret to soft bakery-style buns is giving the dough enough time to rise. Rushing this step creates dense, heavy bread.
🧾 Ingredients (With Exact Measurements + Pro Notes)
For the Soft Bun Dough
Essential Ingredients
- 4 cups all-purpose flour (500 g / 17.6 oz)
- Creates the structure of the buns.
- Bread flour can be used for a chewier texture.
- 2 teaspoons instant yeast (7 g / 0.25 oz)
- Helps the dough rise and become fluffy.
- 2 tablespoons sugar (25 g / 0.9 oz)
- Adds slight sweetness and helps activate yeast.
- 1 teaspoon salt (5 g / 0.17 oz)
- Enhances overall flavor.
- 1 cup warm milk (240 ml / 8 oz)
- Makes the buns softer and richer.
- ¼ cup warm water (60 ml / 2 oz)
- Helps create the right dough consistency.
- 3 tablespoons butter, melted (42 g / 1.5 oz)
- Adds softness and buttery flavor.
- 1 large egg (50 g / 1.8 oz)
- Improves texture and color.
🥩 For the Cheesy Beef Filling
- 500 g ground beef (1.1 lb / 17.6 oz)
- The main filling, providing rich savory flavor.
- 1 tablespoon cooking oil (15 ml / 0.5 oz)
- Used for sautéing.
- 1 medium onion, finely chopped (150 g / 5.3 oz)
- Adds sweetness and depth.
- 3 garlic cloves, minced (9 g / 0.3 oz)
- Gives a delicious aromatic flavor.
- 1 teaspoon paprika (3 g / 0.1 oz)
- Adds color and mild smokiness.
- 1 teaspoon black pepper (2 g / 0.07 oz)
- Adds warmth.
- 1 teaspoon chili flakes (optional)
- Adds gentle heat.
- 1 teaspoon dried oregano (1 g / 0.03 oz)
- Creates a restaurant-style flavor.
- 1 tablespoon tomato paste (16 g / 0.5 oz)
- Adds richness and balances the beef flavor.
- ½ teaspoon salt (adjust to taste)
🧀 Cheese Layer
- 2 cups shredded mozzarella cheese (200 g / 7 oz)
- Creates the famous stretchy cheese pull.
- ½ cup cheddar cheese (50 g / 1.8 oz)
- Adds stronger cheesy flavor.
Cheese Substitutions
You can use:
- Monterey Jack for extra meltiness
- Gouda for a rich flavor
- Swiss cheese for a mild taste
- A cheese blend for the best texture
Optional Toppings
- 1 tablespoon sesame seeds
- 1 tablespoon chopped parsley
- 1 egg mixed with 1 tablespoon milk for brushing
- Extra melted butter for finishing
🥗 Nutritional Information (Per Serving)
(Approximate values for 1 cheesy beef hot dog bun)
- Calories: 420
- Protein: 22 g
- Carbohydrates: 38 g
- Fat: 21 g
- Fiber: 2 g
Key Vitamins & Minerals
- Calcium from cheese
- Iron from beef
- Vitamin B12 from beef
- Zinc from beef
- Vitamin A from dairy ingredients
Dietary Information
- ❌ Not keto-friendly (contains flour)
- ❌ Not vegan
- ❌ Not dairy-free
- Can be made gluten-free by using gluten-free flour and suitable ingredients.
Weight Loss Friendly?
Traditional cheesy beef buns are a comfort food and higher in calories. For a lighter version, use lean beef, reduced-fat cheese, and smaller buns.
🍳 Kitchen Tools Needed
Basic Tools
- Large mixing bowl
- Measuring cups and spoons
- Wooden spoon or spatula
- Sharp knife
- Cutting board
- Frying pan
- Baking tray
- Parchment paper
- Kitchen towel
Optional Upgrades
- Stand mixer with dough hook
- Kitchen thermometer
- Pastry brush
- Food scale
No stand mixer? No problem. Kneading by hand works perfectly and gives you better control over the dough texture.
👩🍳 Step-by-Step Instructions
Step 1: Prepare the Dough
In a large bowl, combine:
- Warm milk
- Warm water
- Sugar
- Instant yeast
Mix gently and let it sit for 5–10 minutes.
The mixture should look slightly foamy.
What should NOT happen:
If there are no bubbles after 10 minutes, your yeast may not be active.
Step 2: Make the Dough
Add:
- Flour
- Salt
- Egg
- Melted butter
Mix until a rough dough forms.
Knead for 8–10 minutes until smooth and elastic.
The dough should feel:
- Soft
- Slightly sticky
- Stretchy
Avoid adding too much flour because it can make the buns hard.
Step 3: First Rise
Place the dough in a lightly greased bowl.
Cover with a clean towel.
Let it rise for 1–1½ hours at room temperature.
The dough should double in size.
Step 4: Prepare the Beef Filling
Heat oil in a pan over medium heat.
Add onions and cook for 2–3 minutes until soft.
Add garlic and cook for 30 seconds.
Add ground beef.
Cook for 8–10 minutes, breaking it apart with a spoon.
Add:
- Paprika
- Pepper
- Salt
- Oregano
- Tomato paste
Cook for another 2 minutes.
The filling should be:
- Fully cooked
- Moist but not watery
- Richly colored
Let it cool before filling the buns.
Step 5: Shape the Buns
Once the dough has doubled in size, gently press it down to release excess air.
Divide the dough into 8 equal portions (about 90–100 g each).
Roll each portion into a small rectangle.
Add:
- 2–3 tablespoons cooked beef filling
- A generous amount of shredded cheese
Fold the dough over the filling and pinch the edges firmly to seal.
Place each bun seam-side down on a lined baking tray.
Visual cue:
The buns should look smooth, plump, and evenly shaped.
Avoid:
Do not overfill the buns. Too much filling can cause them to burst while baking.
Step 6: Second Rise
Cover the shaped buns loosely with a kitchen towel.
Let them rest for 30–45 minutes.
During this time, they should become noticeably bigger and softer.
This second rise creates the fluffy bakery-style texture.
Step 7: Prepare for Baking
Preheat your oven to:
375°F (190°C)
for about 10–15 minutes.
Brush the tops of the buns with:
- 1 beaten egg mixed with 1 tablespoon milk
Sprinkle with:
- Sesame seeds
- Parsley
- Extra cheese (optional)
The egg wash gives the buns a beautiful golden finish.
Step 8: Bake the Cheesy Beef Hot Dog Buns
Bake for:
18–22 minutes
until the tops are golden brown.
You will know they are ready when:
- The bread looks golden
- The buns feel light when lifted
- The cheese is melted
- The kitchen smells buttery and savory
What should NOT happen:
- Dark brown tops → oven temperature may be too high
- Hard crust → buns may have baked too long
- Dense bread → dough may not have risen enough
Step 9: Add the Final Touch
Remove the buns from the oven.
Brush lightly with melted butter while still warm.
This keeps the crust soft and gives the buns a delicious bakery shine.
Let them rest for 5–10 minutes before serving.
This short waiting time allows the cheese and filling to settle.
👨🍳 Chef-Level Tips & Mistakes to Avoid
1. Use Room Temperature Ingredients
Cold ingredients slow down yeast activity.
For the softest buns:
- Use room-temperature eggs
- Warm milk slightly
- Avoid cold butter
2. Do Not Overcook the Beef Filling
The beef should be flavorful and moist.
Overcooking creates dry filling that makes the buns less enjoyable.
Professional trick:
Remove the beef from heat as soon as it is cooked and let it cool before stuffing.
3. Shred Your Own Cheese
Pre-shredded cheese often contains anti-caking powder, which can affect melting.
Freshly shredded cheese gives:
- Better cheese pull
- Smoother texture
- Richer flavor
4. Seal the Dough Properly
A weak seal can cause cheese and filling to leak during baking.
Before baking:
- Pinch edges tightly
- Place the seam underneath
- Avoid stretching the dough too thin
5. Give the Dough Enough Time
One of the biggest beginner mistakes is rushing the rise.
Good bread needs time.
A slow, proper rise creates:
- Soft texture
- Better flavor
- Airy crumbs
🌶️ Variations & Customizations
1. Spicy Cheesy Beef Hot Dog Buns
For spice lovers, add:
- 1 finely chopped jalapeño
- ½ teaspoon cayenne pepper
- Extra chili flakes
- Pepper jack cheese
This version has a bold, exciting kick.
Perfect for game nights and gatherings.
2. Healthy Version
Make a lighter version by:
- Using lean ground beef
- Replacing some beef with mushrooms or vegetables
- Using whole wheat flour
- Choosing reduced-fat cheese
You still get the comforting flavor with fewer calories.
3. Kids-Friendly Version
Children love simple flavors.
Try:
- Mild cheddar cheese
- Less seasoning
- Tiny beef pieces
- A little ketchup inside
You can also make smaller mini buns for lunchboxes.
4. Restaurant-Style Cheesy Beef Buns
For a premium bakery-style version, add:
- Caramelized onions
- Smoked cheese
- Fresh herbs
- Garlic butter topping
Serve warm on a wooden board for a beautiful presentation.
5. Breakfast Version
Turn these into a morning favorite.
Add:
- Scrambled eggs
- Turkey slices
- Spring onions
- Extra cheese
They are perfect for busy mornings.
6. International Fusion Twist
Try different flavors:
Mexican Style:
Add:
- Salsa
- Jalapeños
- Taco seasoning
Italian Style:
Add:
- Basil
- Mozzarella
- Marinara sauce
Middle Eastern Style:
Add:
- Cumin
- Coriander
- Fresh herbs
🧊 Storage & Reheating Guide
How to Store Cheesy Beef Hot Dog Buns
Room Temperature
Best enjoyed fresh.
Store covered for:
Up to 1 day
Keep away from direct sunlight and heat.
Refrigerator
Place buns in an airtight container.
Shelf life:
3–4 days
The bread may become slightly firmer but reheats well.
Freezer Storage
These buns freeze beautifully.
Freezing Instructions:
- Allow baked buns to cool completely.
- Wrap each bun individually.
- Place in a freezer bag.
- Freeze for up to 2 months.
🔥 Best Reheating Methods
Oven Method (Best Texture)
Temperature:
350°F (175°C)
Time:
8–10 minutes
Wrap loosely in foil to prevent drying.
Air Fryer Method
Temperature:
320°F (160°C)
Time:
4–6 minutes
This creates a slightly crispy outside with a soft center.
Microwave Method
Time:
30–60 seconds
Best for quick reheating.
Tip: Place a damp paper towel over the bun to keep it soft.
🍽️ Serving Suggestions
These Cheesy Beef Hot Dog Buns are delicious on their own, but the right sides make them a complete meal.
Best Side Dishes
Serve with:
- French fries
- Potato wedges
- Coleslaw
- Fresh salad
- Pickles
- Roasted vegetables
- Soup
Sauce Pairings
Try:
- Garlic mayo
- Ketchup
- Mustard
- Barbecue sauce
- Spicy chili sauce
- Ranch dressing
Perfect Drinks
Pair with:
- Fresh lemonade
- Iced tea
- Milkshakes
- Soft drinks
- Fresh fruit juices
🎨 Presentation Tips
Want bakery-style presentation?
Try these ideas:
- Arrange buns in a wooden serving basket
- Sprinkle fresh herbs on top
- Serve with small dipping bowls
- Add colorful side salads
- Cut one bun open to show the cheesy filling
The cheese pull alone will make everyone hungry.
❓ Frequently Asked Questions
1. Can I use store-bought hot dog buns for this recipe?
Yes. If you are short on time, you can use ready-made buns and fill them with cooked cheesy beef. However, homemade dough gives a softer and fresher result.
2. Can I prepare Cheesy Beef Hot Dog Buns ahead of time?
Yes. You can prepare the dough and filling ahead.
Store the filling in the refrigerator for up to 2 days, then assemble and bake when needed.
3. Why are my buns not soft?
Common reasons include:
- Too much flour
- Not enough kneading
- Skipping the second rise
- Overbaking
Follow the rising times carefully for fluffy buns.
4. Can I use chicken instead of beef?
Absolutely.
Ground chicken or shredded chicken works well. Adjust seasoning because chicken has a milder flavor.
5. How do I prevent the cheese from leaking out?
Make sure:
- The filling is cool before adding
- The dough edges are sealed tightly
- The buns are not overfilled
6. Can I make these without eggs?
Yes.
Replace the egg in the dough with:
- 3 tablespoons yogurt
- 2 tablespoons extra milk
For brushing, use milk or melted butter.
7. Can I make these in an air fryer?
Yes.
Cook at:
330°F (165°C) for 10–14 minutes
depending on size.
Check that the bread is golden and fully cooked.
❤️ Final Thoughts
Some recipes are special because they are fancy. Others become favorites because they bring people together.
These Cheesy Beef Hot Dog Buns belong to the second category.
They are warm, comforting, filling, and made for sharing. From the first bite of soft bread to the last stretch of melted cheese, every part feels homemade and satisfying.
Make them for your family, prepare them for your next gathering, or keep a batch in the freezer for busy days when you need something delicious and comforting.
If you try this recipe, I would love to hear about your experience. Tell us what cheese you used, what flavors you added, and how your family enjoyed these cheesy beef buns.
Share your creation with friends and family on social media, because good food is always better when shared.
Happy baking! 🧀🥩🥖