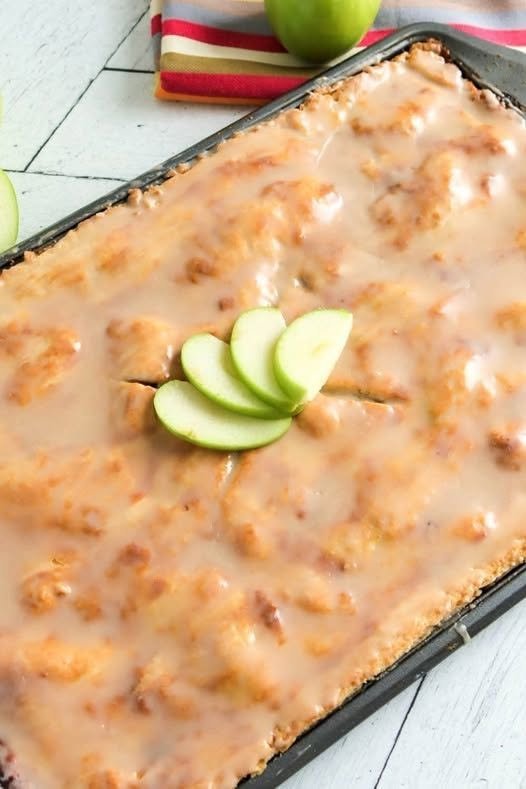
Fried Glazed Apple Sheet Pie
There’s something wonderfully nostalgic about the smell of apples, cinnamon, and buttery pastry baking together in the kitchen. It’s the kind of aroma that makes people slow down, peek into the oven, and remember homemade desserts shared around crowded family tables. Fried Glazed Apple Sheet Pie takes that classic apple pie comfort and transforms it into a crowd-sized treat with a golden crust, sweet spiced apple filling, and a shiny glaze that makes every slice irresistible.
Imagine biting into a flaky pastry layer that gives way to tender cinnamon apples coated in a rich, buttery filling. The sweet glaze crackles slightly on top while the warm apple flavour melts in your mouth. It has all the cosy charm of a traditional apple pie but with the convenience of a sheet-pan dessert that is perfect for feeding a crowd.
This recipe is ideal for holidays, potlucks, family gatherings, bake sales, or those afternoons when you simply crave an old-fashioned dessert made with love. Unlike a traditional round pie, a sheet pie creates more servings, slices beautifully, and is easy to transport.
If you love classic apple desserts, this Fried Glazed Apple Sheet Pie is about to become one of your most requested recipes.
💛 Why You’ll Love This Recipe
- 🍎 Easy to Make: Simple ingredients and straightforward steps.
- 🥧 Perfect for Crowds: A large sheet pie makes plenty of servings.
- 💰 Budget-Friendly: Uses affordable baking staples and seasonal apples.
- 👩🍳 Beginner-Friendly: Great for anyone learning pie-making.
- ✨ Beautiful Finish: A sweet glaze creates a bakery-style appearance.
- ☕ Comforting & Nostalgic: Tastes like a homemade family recipe.
- 🎉 Perfect for Occasions: Great for holidays, picnics, potlucks, birthdays, and gatherings.
- 🍏 Great for Apple Season: A delicious way to enjoy fresh autumn apples.
- ❄️ Make-Ahead Friendly: Prepare it in advance for stress-free entertaining.
Pro Tip: Use a mix of sweet and tart apples for a deeper, more balanced flavour.
🧾 Ingredients (With Exact Measurements + Pro Notes)
For the Pastry
All-Purpose Flour
- 500 g (4 cups / 17.6 oz)
Creates the flaky pie crust.
Unsalted Butter (Cold, Cubed)
- 250 g (1 cup / 8.8 oz)
Adds richness and creates a tender, flaky texture.
Salt
- 1 teaspoon
Enhances the flavour.
Granulated Sugar
- 30 g (2 tablespoons / 1 oz)
Adds a subtle sweetness.
Cold Water
- 120 ml (½ cup / 4 fl oz)
Helps bring the dough together.
Apple Cider Vinegar
- 1 tablespoon (15 ml)
Helps create a tender crust.
For the Apple Filling
Apples (Peeled, Cored, Sliced)
- 1.2 kg (about 8 cups / 42 oz)
Best choices:
- Granny Smith
- Honeycrisp
- Fuji
- Pink Lady
Why it’s used: Creates the juicy, sweet centre.
Brown Sugar
- 150 g (¾ cup / 5.3 oz)
Adds caramel-like sweetness.
Granulated Sugar
- 50 g (¼ cup / 1.8 oz)
Balances the apple flavour.
Cornstarch
- 30 g (4 tablespoons / 1 oz)
Thickens the apple juices.
Ground Cinnamon
- 2 teaspoons
Adds classic warm spice.
Nutmeg
- ¼ teaspoon
Adds depth and a cosy aroma.
Lemon Juice
- 2 tablespoons (30 ml)
Brightens the apples.
Vanilla Extract
- 2 teaspoons (10 ml)
Enhances the sweetness.
Unsalted Butter
- 30 g (2 tablespoons)
Creates a richer filling.
For the Glaze
Powdered Sugar
- 180 g (1½ cups / 6.3 oz)
Creates a smooth sweet topping.
Milk
- 45 ml (3 tablespoons)
Adjust for desired consistency.
Vanilla Extract
- 1 teaspoon
Adds flavour.
Optional Ingredients
- Chopped pecans: 75 g (¾ cup / 2.6 oz)
- Caramel drizzle: 60 ml (¼ cup)
- Raisins: 75 g (½ cup)
- Orange zest: 1 teaspoon
Smart Ingredient Swaps
- Use store-bought refrigerated pie dough to save time.
- Replace butter with plant-based butter for dairy-free baking.
- Use gluten-free flour blend for a gluten-free crust.
- Add pears with apples for a fruity variation.
🥗 Nutritional Information (Per Serving)
Approximate values based on 16 servings:
- Calories: 390
- Protein: 4 g
- Carbohydrates: 55 g
- Fat: 18 g
- Fiber: 3 g
- Vitamin C: Moderate
- Potassium: Moderate
- Calcium: Small amount
- Iron: Small amount
Dietary Information
- ❌ Keto-Friendly
- ❌ Vegan (unless substitutions are used)
- ❌ Dairy-Free (unless substitutions are used)
- ❌ Gluten-Free (unless using gluten-free flour)
- ⚖️ Weight-Loss Friendly: Best enjoyed as an occasional dessert.
Did You Know? Apples contain natural pectin, which helps create a naturally thicker fruit filling when cooked.
🍳 Kitchen Tools Needed
Basic Equipment
- Large baking sheet (about 10×15 inches)
- Mixing bowls
- Rolling pin
- Knife
- Cutting board
- Measuring cups
- Measuring spoons
- Saucepan
- Pastry brush
Optional Upgrades
- Food processor for making pastry
- Apple slicer
- Pizza cutter for neat portions
- Cooling rack
No rolling pin? A clean glass bottle works as a substitute.
👩🍳 Step-by-Step Instructions
Step 1: Prepare the Dough
In a large bowl, combine:
- Flour
- Sugar
- Salt
Add cold butter cubes.
Cut the butter into the flour using a pastry cutter or fingertips until the mixture resembles coarse crumbs.
Add cold water and vinegar gradually.
Mix until the dough comes together.
⚠️ Do not knead too much. Overworking creates a tough crust.
Step 2: Chill the Dough
Divide dough into two portions.
Wrap and refrigerate for at least 1 hour.
This helps the butter firm up and creates a flaky crust.
Step 3: Prepare the Apple Filling
Add sliced apples to a large bowl.
Mix with:
- Brown sugar
- Granulated sugar
- Cornstarch
- Cinnamon
- Nutmeg
- Lemon juice
- Vanilla
Let sit for 15 minutes.
Step 4: Cook the Apples
Transfer the mixture to a saucepan.
Cook over medium heat for 8–10 minutes.
Stir occasionally until apples soften slightly and the juices thicken.
Visual cue: The filling should look glossy and syrupy.
⚠️ Do not cook until apples become mushy.
Allow to cool.
Step 5: Roll the Bottom Crust
Preheat oven to:
190°C (375°F)
Roll one dough portion into a rectangle slightly larger than the baking sheet.
Press gently into the pan.
Step 6: Add the Apple Filling
Spread the cooled apple mixture evenly over the crust.
Leave a small border around the edges.
Step 7: Add the Top Crust
Roll out the second dough portion.
Place over the apples.
Seal edges by pressing with a fork.
Cut small vents across the top.
Step 8: Bake
Bake for 40–50 minutes.
The pie is ready when:
- The crust is golden brown.
- The filling bubbles slightly.
- The aroma smells buttery and spiced.
If the crust browns too quickly, cover loosely with foil.
Step 9: Prepare the Glaze
Whisk together:
- Powdered sugar
- Milk
- Vanilla
until smooth.
Adjust thickness as needed.
Step 10: Glaze and Serve
Allow the pie to cool for 20–30 minutes.
Drizzle glaze over the top.
Slice into squares and serve.
👨🍳 Chef-Level Tips & Mistakes to Avoid
Pro Tips
- Keep pastry ingredients cold.
- Use firm apples that hold their shape.
- Cool filling before assembling.
- Brush crust with egg wash for extra shine.
- Add glaze after the pie has cooled slightly.
Common Mistakes
Soggy Bottom Crust
Cause: Filling was too warm.
Fix: Cool the apple filling completely before assembling.
Tough Pastry
Cause: Overmixing dough.
Handle gently.
Runny Filling
Cause: Not enough thickener or undercooking.
Cook apples until juices thicken.
Burnt Glaze
Never glaze before baking.
🌟 Variations & Customisations
🍯 Caramel Apple Version
Add:
- Caramel sauce
- Sea salt flakes
- Toasted pecans
🥗 Lighter Version
- Reduce sugar.
- Use a thinner crust.
- Add more apples and less glaze.
👧 Kids-Friendly Version
Add:
- Mini chocolate chips
- Cinnamon sugar topping
- Vanilla icing designs
🍽️ Bakery-Style Version
Top with:
- Thick vanilla glaze
- Toasted nuts
- Fresh whipped cream
🌍 Creative Twist
Try:
- Apple cranberry filling
- Maple cinnamon glaze
- Ginger-spiced apples
- Apple and pear combination
🧊 Storage & Reheating Guide
Refrigerator
Store covered for 4–5 days.
Freezer
Freeze individual slices for up to 3 months.
Wrap tightly before freezing.
Reheating
Oven
Warm at 160°C (320°F) for 10 minutes.
Microwave
Heat slices for 20–30 seconds.
The oven keeps the crust crisp.
🍽️ Serving Suggestions
Best Pairings
- Vanilla ice cream
- Whipped cream
- Caramel sauce
- Custard
- Fresh apple slices
Drink Pairings
- Coffee
- Apple cider
- Chai tea
- Hot chocolate
- Vanilla latte
Garnishing Ideas
- Powdered sugar
- Cinnamon sprinkle
- Caramel drizzle
- Chopped walnuts
- Fresh mint
Plating Tips
Serve warm squares on dessert plates with a scoop of vanilla ice cream melting beside the glazed crust. Add a light caramel drizzle for a restaurant-style finish.
Did You Know? Sheet pies became popular because they offered all the flavour of traditional pies while being easier to slice, serve, and share at large gatherings.
❓ Frequently Asked Questions
1. Can I use store-bought pie crust?
Yes. It saves time and still creates a delicious dessert.
2. What apples are best for apple sheet pie?
Firm apples like Granny Smith, Honeycrisp, Fuji, and Pink Lady work best.
3. Why is my apple filling watery?
The apples may have released too much liquid or the filling needed more cooking time.
4. Can I make this pie ahead of time?
Yes. It can be made one day ahead and stored covered.
5. Can I freeze apple sheet pie?
Yes. Freeze slices tightly wrapped for up to three months.
6. How do I keep the crust crispy?
Reheat leftovers in the oven instead of the microwave.
7. Can I add nuts to the filling?
Absolutely. Pecans or walnuts add wonderful texture and flavour.
Make this delicious Fried Glazed Apple Sheet Pie with a flaky crust, spiced apple filling, and sweet glaze. Discover step-by-step instructions, expert tips, variations, storage advice, FAQs, and serving ideas for a classic homemade dessert.
Some desserts are remembered because they taste amazing, but others are remembered because of the feelings they create. Fried Glazed Apple Sheet Pie is the kind of recipe that fills your kitchen with warmth, brings people together, and turns simple ingredients into something truly special.
Whether you serve it during the holidays, bring it to a gathering, or enjoy a quiet slice with coffee, this homemade apple dessert is guaranteed to create sweet memories.
If you try this recipe, I’d love to hear how it turned out! Share your favourite apple pie twists, leave a comment with your experience, and don’t forget to share your beautiful dessert photos on social media. Happy baking!