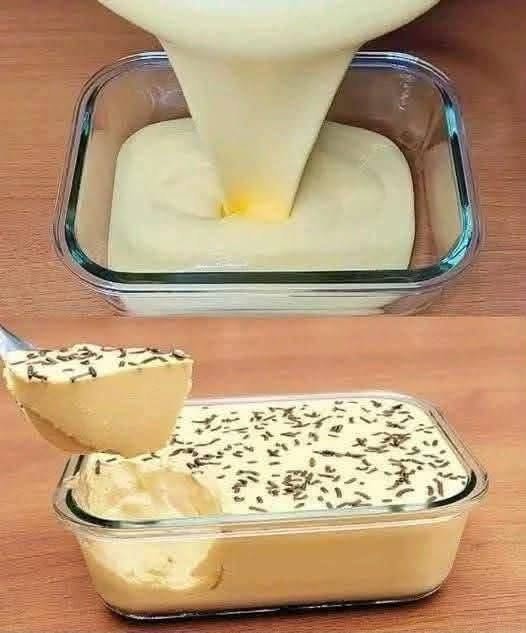
Quick and Easy Classic Homemade Custard Dessert with 2 Ingredients
Learn how to make a quick and easy 2-ingredient homemade custard dessert with this foolproof recipe. Creamy, smooth, budget-friendly, and perfect for beginners, this classic custard comes together in minutes with simple pantry staples.
Quick and Easy Classic Homemade Custard Dessert with 2 Ingredients That Everyone Will Love
Some desserts have a magical way of taking us back to childhood. Just one spoonful can remind you of cosy evenings at home, family dinners, or the comforting aroma drifting from the kitchen as someone special prepared a simple treat with love.
That’s exactly what this Quick and Easy Classic Homemade Custard Dessert delivers.
With only two everyday ingredients, you can transform ordinary milk into a silky, creamy dessert that’s rich, comforting, and surprisingly elegant. No complicated techniques. No expensive ingredients. No hours spent in the kitchen.
As the custard gently thickens on the stove, it becomes irresistibly smooth with a velvety texture that melts in your mouth. Whether served warm on a chilly evening or chilled for a refreshing dessert, this recipe proves that sometimes the simplest recipes are truly the best.
The best part? Even if you’ve never made custard before, this beginner-friendly recipe is almost impossible to mess up once you know a few simple tricks. Keep reading, and you’ll learn every secret to making perfectly creamy homemade custard every single time.
💛 Why You’ll Love This Recipe
- ✅ Only 2 simple ingredients
- ✅ Ready in about 10 minutes
- ✅ Perfect for beginner cooks
- ✅ Budget-friendly and family-friendly
- ✅ Rich, creamy, and comforting
- ✅ Great for weeknight desserts or last-minute guests
- ✅ Delicious served warm or cold
- ✅ Easily customised with your favourite toppings
- ✅ No baking required
- ✅ A nostalgic dessert loved by both kids and adults
Pro Tip: This simple custard also works as a delicious filling for pies, trifles, pastries, and fruit tarts.
Did You Know?
Custard has been enjoyed for centuries around the world. While traditional recipes often use eggs, many modern versions rely on custard powder, making preparation much quicker while still delivering that smooth, creamy texture everyone loves.
🧾 Ingredients (With Exact Measurements + Pro Notes)
Makes: 4 servings
Essential Ingredients
Whole Milk
- 500 ml
- 2 cups
- 17 fl oz
Why it’s used:
Whole milk creates a rich and creamy custard.
Substitutions:
- Semi-skimmed milk (lighter texture)
- Oat milk
- Soy milk
- Almond milk (slightly thinner)
Vanilla Custard Powder
- 40 g
- 4 tablespoons
- 1.4 oz
Why it’s used:
Custard powder thickens the dessert while providing its classic flavour and golden colour.
Optional (Not Counted in the 2 Ingredients)
- 2 tablespoons sugar (if your custard powder is unsweetened)
- Fresh berries
- Banana slices
- Chopped pistachios
- Cinnamon
- Nutmeg
- Chocolate shavings
- Whipped cream
🥗 Nutritional Information (Per Serving)
Approximate values (without optional toppings).
- Calories: 140
- Protein: 5 g
- Carbohydrates: 20 g
- Fat: 4 g
- Fibre: 0 g
Key Vitamins & Minerals
- Calcium
- Vitamin D (if fortified milk is used)
- Vitamin B12
- Phosphorus
- Potassium
Dietary Information
- Vegetarian
- Gluten-free (if using gluten-free custard powder)
- Can be made dairy-free with plant-based milk
- Not keto-friendly
- Suitable for moderate-calorie desserts
🍳 Kitchen Tools Needed
Basic Equipment
- Medium saucepan
- Measuring jug
- Measuring spoons
- Whisk
- Mixing bowl
- Serving bowls
Optional Tools
- Silicone spatula
- Fine sieve for extra-smooth custard
No whisk?
Use a fork to blend the custard powder thoroughly before cooking.
👩🍳 Step-by-Step Instructions
Step 1: Reserve Some Milk
Pour about 100 ml (⅓ cup) of the cold milk into a small bowl.
Keep the remaining 400 ml in the saucepan.
Step 2: Mix the Custard Powder
Add the custard powder to the reserved cold milk.
Whisk until completely smooth.
There should be no lumps.
Pro Tip: Always mix custard powder with cold milk first. Adding it directly to hot milk will create stubborn lumps.
Step 3: Heat the Milk
Place the saucepan over medium heat.
Warm the remaining milk until it is steaming but not boiling.
Time: 3–4 minutes.
Step 4: Combine
Slowly pour the custard mixture into the warm milk while whisking continuously.
Continue stirring.
Within 2–4 minutes, the mixture will begin to thicken.
Visual cue:
The custard should coat the back of a spoon.
What should NOT happen:
Don’t let the mixture boil vigorously, as this can affect the smooth texture.
Step 5: Finish Cooking
Reduce the heat to low.
Cook for another 1 minute, stirring constantly.
The custard should become silky, glossy, and thick enough to hold gentle ribbons when lifted with a spoon.
Step 6: Serve
Serve immediately while warm, or pour into serving dishes.
Cover the surface with cling film touching the custard to prevent a skin from forming.
Refrigerate for 2–3 hours if serving chilled.
Chef’s Tip: Stir in a splash of vanilla extract after cooking for an even richer flavour.
👨🍳 Chef-Level Tips & Mistakes to Avoid
Always Use Cold Milk for Mixing
This prevents lumps before cooking begins.
Whisk Constantly
Continuous whisking creates an ultra-smooth custard.
Don’t Rush the Heat
Medium heat gives better control and prevents scorching.
Avoid Over-Thickening
Custard continues to thicken as it cools.
Remove it from the heat just before it reaches your desired consistency.
Rescue Tips
Too thick?
Whisk in a little warm milk.
Too thin?
Cook for another minute while stirring.
Lumpy?
Pass the custard through a fine sieve while still warm.
🌟 Variations & Customisations
Chocolate Version
Whisk in 2 tablespoons cocoa powder with the custard powder.
Healthier Version
Use low-fat milk and reduce or skip added sugar if your custard powder allows.
Kids-Friendly Version
Top with colourful fruit, sprinkles, or crushed biscuits.
Restaurant-Style Version
Layer chilled custard with fresh berries, sponge cake, and whipped cream in elegant dessert glasses.
Creative Fusion Version
Mix in mango purée, passion fruit, coffee, caramel sauce, or crushed biscuits for exciting new flavours.
🧊 Storage & Reheating Guide
Refrigerator
Store in an airtight container for 3 days.
Freezer
Freezing is not recommended, as the texture may become grainy after thawing.
Reheating
Microwave
Heat in 20-second intervals, stirring after each interval.
Stovetop
Warm gently over low heat while whisking continuously.
Add a splash of milk if needed.
🍽️ Serving Suggestions
This creamy custard pairs beautifully with:
Fresh Fruit
- Strawberries
- Blueberries
- Mango
- Kiwi
- Bananas
Cakes & Desserts
- Sponge cake
- Apple crumble
- Bread pudding
- Brownies
- Fruit pie
Garnishes
- Cinnamon
- Nutmeg
- Toasted almonds
- Pistachios
- Chocolate curls
- Mint leaves
Plating Tip
Serve in clear glass dessert bowls and top with fresh berries and a mint sprig for an elegant café-style presentation.
❓ Frequently Asked Questions
Can I make this custard ahead of time?
Yes. Store it in the refrigerator for up to three days.
Why did my custard become lumpy?
Usually because the custard powder was added directly to hot milk or wasn’t whisked well enough with cold milk first.
Can I use plant-based milk?
Absolutely. Oat, soy, and almond milk all work, although the final texture may be slightly lighter.
Can I serve it warm?
Yes. It’s delicious served immediately after cooking or chilled later.
Can I make it thicker?
Yes. Add an extra tablespoon of custard powder mixed with cold milk before cooking.
Can I flavour it differently?
Definitely. Vanilla, chocolate, coffee, citrus zest, or fruit purées all make wonderful additions.
Final Thoughts
There’s something wonderfully satisfying about creating a rich, creamy dessert from just two simple ingredients. This Quick and Easy Classic Homemade Custard Dessert proves that you don’t need a long ingredient list or complicated techniques to make something truly comforting and delicious.
Whether you’re preparing a quick family dessert, a nostalgic treat, or a silky base for your favourite puddings, this easy custard recipe is one you’ll come back to again and again.
Give this recipe a try and see just how effortless homemade custard can be! If you make it, leave a comment to share your favourite topping or creative twist. Don’t forget to snap a photo and share it on social media to inspire other dessert lovers. Happy cooking!