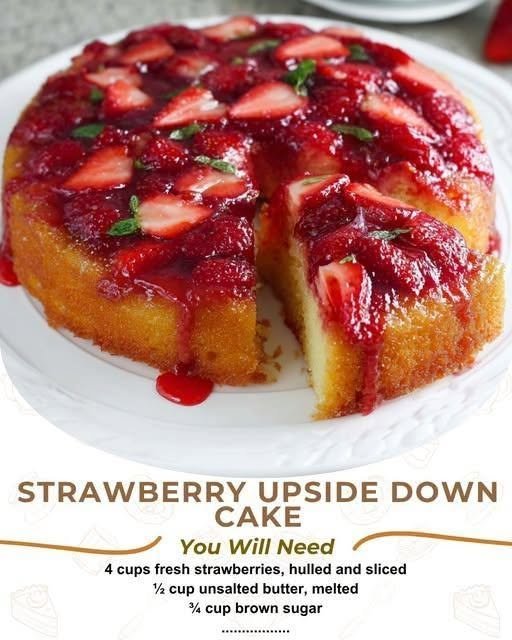
Strawberry Upside Down Cake
There’s a moment when this cake comes out of the oven that feels almost magical. The sweet aroma of strawberries, butter, and vanilla fills the kitchen while a glossy ruby-red fruit layer bubbles gently beneath a golden cake. Then comes the exciting part—turning the cake upside down and revealing a beautiful strawberry topping that looks like it came straight from a bakery.
Strawberry Upside Down Cake is the kind of dessert that turns ordinary ingredients into something unforgettable. Juicy strawberries become soft and jammy as they bake, soaking the buttery cake underneath with their bright summer flavour. Every forkful delivers a perfect balance of tender vanilla cake, caramelised fruit, and a hint of sweetness that feels both elegant and comforting.
Whether you’re making it for Mother’s Day, Easter, a birthday celebration, afternoon tea, a summer picnic, or simply because you have fresh strawberries waiting to be enjoyed, this homemade cake is guaranteed to make people smile. It’s beautiful enough for guests but simple enough for a weekend baking project.
If you love classic upside-down cakes and fresh strawberry desserts, this recipe is about to become one of your favourites.
💛 Why You’ll Love This Recipe
- 🍓 Fresh & Flavorful: Packed with juicy strawberries and sweet vanilla cake.
- ⏱️ Easy to Make: Simple preparation with no complicated decorating.
- 💰 Budget-Friendly: Uses basic baking ingredients and seasonal fruit.
- 👩🍳 Beginner-Friendly: Perfect for new bakers.
- 🍰 Beautiful Presentation: The strawberry topping creates a naturally stunning finish.
- ☀️ Perfect for Spring & Summer: A refreshing dessert for warm-weather gatherings.
- 🎉 Great for Celebrations: Ideal for birthdays, brunches, holidays, potlucks, and family dinners.
- ❤️ Comforting & Nostalgic: A homemade cake that feels like a family tradition.
- 🍦 Amazing with Ice Cream: Warm cake with cold vanilla ice cream is pure dessert happiness.
Pro Tip: Choose bright, ripe strawberries with strong flavour. The fruit is the star of this cake, so quality matters.
🧾 Ingredients (With Exact Measurements + Pro Notes)
For the Strawberry Topping
Fresh Strawberries (Sliced)
- 500 g (about 4 cups / 17.6 oz)
Creates the beautiful fruity layer.
Substitution: Frozen strawberries can be used, but thaw and drain them first to avoid excess liquid.
Granulated Sugar
- 100 g (½ cup / 3.5 oz)
Helps the strawberries release their juices and creates a glossy topping.
Unsalted Butter
- 60 g (¼ cup / 2 oz)
Adds richness and helps caramelise the fruit.
Cornstarch
- 15 g (2 tablespoons / 0.5 oz)
Helps thicken the strawberry juices.
For the Vanilla Cake
All-Purpose Flour
- 250 g (2 cups / 8.8 oz)
Provides the structure for the cake.
Baking Powder
- 2 teaspoons
Creates a soft and fluffy texture.
Salt
- ½ teaspoon
Balances the sweetness.
Unsalted Butter (Softened)
- 115 g (½ cup / 4 oz)
Creates a tender, rich cake crumb.
Granulated Sugar
- 150 g (¾ cup / 5.3 oz)
Sweetens the cake and helps create a light texture.
Large Eggs
- 2 eggs (about 100 g / 3.5 oz)
Add moisture and structure.
Vanilla Extract
- 2 teaspoons (10 ml)
Enhances the classic cake flavour.
Whole Milk
- 180 ml (¾ cup / 6 fl oz)
Keeps the cake soft and moist.
Optional Ingredients
Lemon Zest
- 1 teaspoon
Brightens the strawberry flavour.
Almond Extract
- ½ teaspoon
Adds a bakery-style flavour.
Whipped Cream
- For serving
Fresh Mint Leaves
- For garnish
Smart Ingredient Swaps
- Use gluten-free flour blend for a gluten-free version.
- Replace butter with plant-based butter for dairy-free baking.
- Use coconut sugar for a deeper caramel flavour.
- Swap strawberries with peaches, cherries, or raspberries.
🥗 Nutritional Information (Per Serving)
Approximate values based on 10 servings:
- Calories: 330
- Protein: 5 g
- Carbohydrates: 48 g
- Fat: 13 g
- Fiber: 2 g
- Vitamin C: High
- Calcium: Moderate
- Iron: Moderate
- Potassium: Moderate
Dietary Information
- ❌ Keto-Friendly
- ❌ Vegan (unless substitutions are used)
- ✅ Gluten-Free option available
- ❌ Dairy-Free (unless substitutions are used)
- ⚖️ Weight-Loss Friendly: Best enjoyed as an occasional dessert.
Did You Know? Strawberries are naturally high in vitamin C and contain antioxidants that help give them their vibrant red colour.
🍳 Kitchen Tools Needed
Basic Equipment
- 9-inch round cake pan
- Mixing bowls
- Electric mixer or whisk
- Measuring cups
- Measuring spoons
- Rubber spatula
- Knife and cutting board
- Cooling rack
Optional Upgrades
- Cake stand for presentation
- Offset spatula
- Digital kitchen scale
- Parchment paper
No electric mixer? A sturdy whisk and a little extra arm power will work.
👩🍳 Step-by-Step Instructions
Step 1: Prepare the Oven and Pan
Preheat your oven to 175°C (350°F).
Grease a 9-inch round cake pan thoroughly.
Place a round piece of parchment paper on the bottom for easier removal.
Step 2: Make the Strawberry Layer
Melt 60 g butter in a saucepan over medium heat.
Add:
- Sugar
- Cornstarch
Stir for 1–2 minutes until combined.
Add sliced strawberries and gently cook for 3–4 minutes.
Visual cue: The strawberries should become glossy and release some juice.
⚠️ Do not cook until mushy. They will continue baking in the oven.
Step 3: Arrange the Strawberries
Spread the strawberry mixture evenly across the bottom of the cake pan.
Set aside.
Step 4: Prepare the Dry Ingredients
In a bowl, whisk together:
- Flour
- Baking powder
- Salt
This helps distribute the raising agent evenly.
Step 5: Cream Butter and Sugar
Beat softened butter and sugar together for 3–4 minutes until light and fluffy.
Visual cue: The mixture should look pale and creamy.
Step 6: Add Eggs and Vanilla
Add eggs one at a time.
Mix well after each addition.
Add vanilla extract and lemon zest if using.
Step 7: Combine the Batter
Add the flour mixture in three parts, alternating with milk.
Mix gently until just combined.
⚠️ Do not overmix. Too much mixing can create a dense cake.
Step 8: Assemble and Bake
Carefully spread the cake batter over the strawberry layer.
Bake for 40–50 minutes.
The cake is ready when:
- The top is golden.
- A toothpick inserted in the centre comes out clean.
- The cake springs back lightly when touched.
Step 9: Flip the Cake
Allow the cake to cool for 10–15 minutes.
Run a knife around the edges.
Place a serving plate over the cake pan.
Carefully flip the cake upside down.
Lift the pan slowly.
The strawberry topping should reveal itself beautifully.
Step 10: Serve
Serve warm, at room temperature, or chilled.
Top with whipped cream or vanilla ice cream.
👨🍳 Chef-Level Tips & Mistakes to Avoid
Pro Tips
- Use room-temperature ingredients for a smoother batter.
- Do not skip greasing the pan.
- Flip the cake while still slightly warm for easier release.
- Add lemon zest to make the strawberries taste brighter.
- Let the cake rest before slicing for cleaner pieces.
Common Mistakes
Cake Sticks to the Pan
Cause: Pan wasn’t greased properly or cake cooled too long.
Fix: Warm the pan slightly before flipping if needed.
Soggy Cake
Cause: Too much strawberry liquid.
Fix: Drain very juicy strawberries slightly before using.
Dense Cake
Cause: Overmixing the batter.
Mix only until combined.
Strawberry Layer Falls Apart
Cause: Flipping too quickly.
Allow the cake to rest for 10–15 minutes first.
🌟 Variations & Customisations
🍫 Chocolate Strawberry Version
Add:
- 30 g cocoa powder
- Chocolate chips
- Chocolate drizzle
Perfect for chocolate lovers.
🥗 Lighter Version
- Reduce sugar slightly.
- Use Greek yoghurt instead of some butter.
- Serve with fresh fruit instead of ice cream.
👧 Kids-Friendly Version
Decorate with:
- Sprinkles
- Mini chocolate chips
- Whipped cream swirls
🍽️ Restaurant-Style Version
Serve with:
- Vanilla bean ice cream
- Strawberry sauce
- Fresh berries
- White chocolate curls
🌍 Creative Fusion Twist
Try adding:
- Coconut flakes
- Orange zest
- Basil-infused strawberries
- Mascarpone cream topping
🧊 Storage & Reheating Guide
Refrigerator
Store covered for 3–4 days.
Keep chilled because of the fruit topping.
Freezer
Freeze individual slices for up to 2 months.
Wrap tightly in plastic wrap and foil.
Reheating
Microwave
Warm slices for 15–20 seconds.
Oven
Heat at 150°C (300°F) for 5–8 minutes.
Avoid overheating, as the fruit topping may become watery.
🍽️ Serving Suggestions
Best Pairings
- Vanilla ice cream
- Fresh whipped cream
- Greek yoghurt
- Strawberry sauce
- Fresh berries
Drink Pairings
- Coffee
- Strawberry lemonade
- Iced tea
- Vanilla latte
- Sparkling water
Garnishing Ideas
- Fresh strawberries
- Mint leaves
- Powdered sugar
- Whipped cream
- Chocolate curls
Plating Tips
Place a slice on a white dessert plate with a spoonful of whipped cream, a few fresh strawberry slices, and a small mint leaf. The bright red topping creates a beautiful restaurant-style presentation with almost no extra effort.
Did You Know? Upside-down cakes became popular because they allowed home bakers to create beautiful fruit-topped desserts without needing complicated frosting techniques.
❓ Frequently Asked Questions
1. Can I use frozen strawberries for Strawberry Upside Down Cake?
Yes. Thaw and drain frozen strawberries before using to prevent excess moisture.
2. Why did my strawberry topping become watery?
The strawberries may have released too much liquid. Using cornstarch and allowing the cake to cool properly helps create a thicker topping.
3. Can I make this cake ahead of time?
Yes. Prepare it a day ahead and store it covered in the refrigerator.
4. How do I stop the cake from sticking?
Grease the pan well, use parchment paper, and flip the cake while it is still slightly warm.
5. Can I use other fruits?
Absolutely. Pineapple, peaches, cherries, blueberries, and raspberries all work beautifully.
6. Can I make this cake gluten-free?
Yes. Replace the flour with a gluten-free 1-to-1 baking blend.
7. Should Strawberry Upside Down Cake be served warm or cold?
Both are delicious. Warm slices pair wonderfully with ice cream, while chilled slices have a firmer, refreshing texture.
Make this beautiful Strawberry Upside Down Cake with juicy strawberries and fluffy vanilla cake. Get exact measurements, step-by-step instructions, expert tips, variations, storage advice, FAQs, and serving ideas for the perfect homemade dessert.
There’s something unforgettable about a dessert that looks as beautiful as it tastes. Strawberry Upside Down Cake captures the joy of homemade baking with every layer—from the sweet, glossy strawberries to the soft vanilla cake underneath. It’s a recipe that feels special without being complicated, making it perfect for sharing with family and friends.
If you try this Strawberry Upside Down Cake, I’d love to hear how it turned out! Share your favourite toppings, baking tips, or creative twists in the comments. Don’t forget to take a photo, share it with fellow dessert lovers on social media, and enjoy every delicious slice. Happy baking!