Melt Discarded Shipping Bubble Wrap + 2 Household Items — The Breathtaking DIY Result No One Expects
Discover how melted shipping bubble wrap and simple household items can transform into stunning DIY creations. A creative, eco-friendly reuse idea explained step-by-step.
The Viral Idea Everyone Keeps Talking About
Every once in a while, a simple DIY idea shows up online that makes people stop scrolling.
At first, it sounds almost unbelievable:
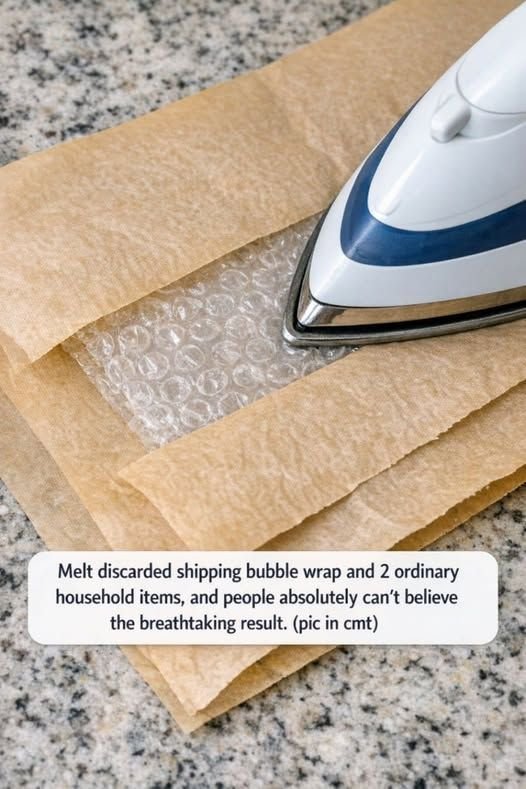
Melt discarded shipping bubble wrap… combine it with two common household items… and create something completely new.
It feels like one of those internet tricks that’s either exaggerated—or dangerously misunderstood.
But when done correctly and safely, this concept isn’t about “magic melting plastic.” It’s about creative plastic reuse, texture fusion, and upcycling waste materials into functional or decorative objects.
And the results? Surprisingly beautiful, practical, and often eco-friendly.
First, Let’s Clear Something Important Up
Before going further:
⚠️ This is NOT about randomly melting plastic at home.
⚠️ This is NOT a kitchen experiment.
⚠️ And it should NEVER be done without proper safety precautions.
Bubble wrap is typically made from polyethylene, a type of plastic that can release harmful fumes if overheated.
So the real focus here is:
👉 safe, controlled crafting and upcycling techniques inspired by industrial recycling principles
Why People Are Obsessed With This DIY Trend
There’s a reason this idea went viral across platforms like Pinterest and TikTok.
It taps into three powerful motivations:
- Reducing waste in a visible, creative way
- Turning “trash” into aesthetic objects
- The satisfaction of transformation
People love seeing something ordinary become something unexpected.
The Core Idea: What Actually Happens When Bubble Wrap Is Heated
Bubble wrap is made of thin plastic layers filled with air pockets.
When heat is carefully applied in controlled environments (like industrial presses or craft-safe tools), the structure:
- Collapses
- Flattens
- Bonds into textured sheets
This creates a unique surface that can be shaped or combined with other materials.
The “2 Household Items” That Complete the Transformation
Most versions of this DIY concept use two simple items found in almost every home:
1. Baking parchment paper
Used to:
- Protect surfaces
- Prevent sticking during heat application
2. An iron or heat press (or similar heat source)
Used to:
- Apply even heat
- Flatten and fuse layers of plastic safely
What You Can Actually Create (The Stunning Results)
When done properly in a controlled craft setting, melted or heat-fused bubble wrap can become:
✨ Textured decorative sheets
These resemble:
- Frosted glass
- Abstract plastic art
- Modern translucent panels
✨ Reusable craft material
Artists use it for:
- Mixed-media art
- Packaging reinforcements
- Creative collage backgrounds
✨ Eco-inspired design pieces
Some creators turn it into:
- Wallet inserts
- Book covers
- Small decorative tiles
The unexpected texture is what makes it visually striking.
Step-by-Step Concept Overview (Safe Craft Version)
This is the general creative process used in controlled environments:
Step 1: Gather materials
- Clean discarded bubble wrap
- Baking parchment paper
- Heat tool (iron or craft press)
Step 2: Layer the materials
- Place bubble wrap between parchment sheets
- Ensure even spacing
Step 3: Apply controlled heat
- Use medium temperature
- Apply briefly and evenly
- Watch texture changes carefully
Step 4: Cool and flatten
- Let material cool completely
- Peel gently to reveal texture
Step 5: Use in creative projects
- Cut into shapes
- Combine with paper, fabric, or resin crafts
Why the Result Looks So “Breathtaking”
The visual appeal comes from:
- Randomized bubble collapse patterns
- Semi-translucent textures
- Organic geometric distortion
- Light reflection changes
Each piece becomes unique—no two results look the same.
That unpredictability is what makes it feel artistic rather than mechanical.
Environmental Angle: Why This Matters
Every year, massive amounts of plastic packaging waste are generated globally.
Upcycling ideas like this contribute to:
- Reducing landfill waste
- Extending material life cycles
- Encouraging creative recycling habits
Organizations focused on sustainability, including groups highlighted by Forbes coverage on green innovation trends, continue to emphasize the importance of rethinking everyday waste.
Pros and Cons of This DIY Concept
| Pros | Cons |
|---|---|
| Reuses waste materials creatively | Requires careful heat control |
| Low-cost craft idea | Not suitable for children unsupervised |
| Unique visual results | Not always structurally strong |
| Encourages sustainability | Can release fumes if done incorrectly |
Common Mistakes Beginners Make
❌ Overheating the plastic
This can damage the material and create unsafe fumes.
❌ Skipping protective layers
Direct heat contact can ruin both tools and material.
❌ Expecting perfect results
The beauty is in randomness—not precision.
❌ Using unventilated spaces
Always ensure airflow when working with heated plastics.
Expert Craft Insight
Professional mixed-media artists often say:
“Controlled imperfection is what makes recycled plastic art visually powerful.”
The irregular bubble collapse patterns mimic natural textures like:
- Stone
- Ice
- Fabric grain
This is why the final result often feels “artistic” instead of artificial.
2026 Trend: Upcycled Plastic Art Is Growing Fast
In recent years, there’s been a surge in:
- Sustainable DIY content
- Home recycling crafts
- Plastic reuse aesthetics
Creators are increasingly turning packaging waste into:
- Fashion accessories
- Home décor
- Installation art
This aligns with broader environmental awareness trends in the U.S. and globally.
Future Outlook
Upcycling techniques like this are expected to evolve into:
- More structured DIY kits
- Eco-art education programs
- Community recycling workshops
As sustainability becomes more mainstream, creative reuse will continue gaining popularity.
Frequently Asked Questions
Is it safe to melt bubble wrap at home?
Only in controlled craft conditions with proper ventilation and indirect heat methods.
Can I use a microwave?
No. This is unsafe and can release toxic fumes.
What happens when bubble wrap is heated?
It flattens and fuses into textured plastic sheets.
Is this environmentally friendly?
It can be, if done safely and as part of reuse—not mass burning or waste.
Can kids do this project?
Only with adult supervision and proper safety precautions.
Why does the result look artistic?
Because the bubble collapse pattern is naturally random and organic.
What can I make from it?
Art panels, decorative crafts, and mixed-media designs.
Does it reduce plastic waste?
Yes, but on a small, individual scale.
Action Checklist
- ✔ Use clean discarded bubble wrap
- ✔ Work in a ventilated area
- ✔ Use protective parchment layers
- ✔ Apply controlled, low heat
- ✔ Allow full cooling before handling
- ✔ Turn results into creative projects
What looks like simple discarded packaging can become something unexpectedly artistic when handled with care and creativity.
The real transformation isn’t just the material—it’s the mindset:
👉 Seeing value in what others throw away.
Final Thought
Sometimes the most surprising beauty doesn’t come from expensive materials or complex tools.
It comes from reimagining what already exists.
And in this case, even something as ordinary as bubble wrap can become a small piece of art—when you look at it differently.
If you’ve ever tried upcycling household waste into something creative, share your experience. Your idea might inspire someone else to start their own DIY transformation.