Crispy on the outside, gooey on the inside Air Fryer Ham and Cheese Sandwich made in minutes—this easy comfort food recipe is perfect for breakfast, lunch, or a quick snack craving.
Air Fryer Ham and Cheese Sandwich – Crispy, Melty, and Comfort in Every Bite
There’s a special kind of hunger that hits when you want something quick, warm, and deeply satisfying—but you don’t want to stand over a stove. Maybe it’s a lazy weekend afternoon, or a busy weekday when your energy is running low but your cravings are loud.
That’s exactly where this Air Fryer Ham and Cheese Sandwich comes in.
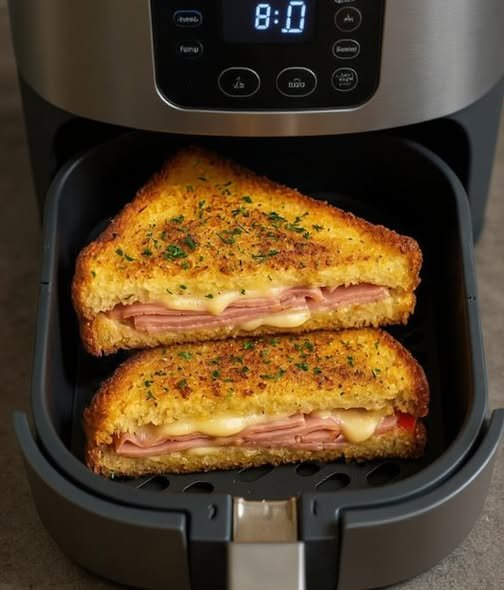
Imagine biting into golden, toasted bread that crackles just slightly under your teeth. Inside, warm ham releases its savory aroma while melted cheese stretches in soft, gooey layers. It’s salty, creamy, buttery, and crisp all at once—the kind of simple food that somehow feels like a reward.
And the best part? Your air fryer does almost all the work.
This is not just a sandwich. It’s comfort food in its fastest, crispiest form.
💛 Why You’ll Love This Recipe
- Super quick: Ready in under 10 minutes
- Crispy & melty perfection: Crunchy outside, gooey inside
- Beginner-friendly: No cooking skills needed
- Minimal ingredients: Pantry staples only
- Perfect anytime: Breakfast, lunch, snack, or late-night craving
- Kid-approved: Loved by both kids and adults
- No mess cooking: No frying pan, no oil splatter
This is the kind of recipe you keep coming back to when you want something fast but satisfying.
🧾 Ingredients (With Exact Measurements + Notes)
Main Ingredients:
- 4 slices bread (120–140g / 4–5 oz)
White, whole wheat, or sourdough all work well - 4 slices cooked ham (100g / 3.5 oz)
Adds savory, salty flavor—smoked ham works best - 4 slices cheese (100g / 3.5 oz)
Cheddar, mozzarella, or Swiss for melty texture
Spreads & Flavor:
- 2 tablespoons butter (30g / 1 oz), softened
Creates golden crispy crust - 1 tablespoon mayonnaise (optional)
Adds creaminess inside - ½ teaspoon black pepper (optional)
Adds mild heat
Optional Add-ons:
- Mustard (for tangy kick)
- Tomato slices (freshness)
- Pickles (sharp contrast)
- Chili flakes (spicy version)
Substitutions:
- Ham → turkey or chicken slices
- Butter → olive oil spread
- Cheese → dairy-free cheese for lactose-free version
🥗 Nutritional Information (Per Sandwich – Approx.)
- Calories: 320 kcal
- Protein: 18g
- Carbohydrates: 28g
- Fats: 15g
- Fiber: 2g
Key Nutrients:
- Calcium (cheese)
- Protein (ham + cheese)
- Vitamin B12 (energy support)
Dietary Notes:
- ❌ Not vegan
- ✔ Can be made dairy-free
- ❌ Not gluten-free (unless gluten-free bread used)
- ⚖️ Moderate weight-loss friendly (portion dependent)
🍳 Kitchen Tools Needed
Basic tools:
- Air fryer
- Butter knife
- Cutting board
- Tongs or spatula
Optional:
- Toothpicks (to hold sandwich together)
- Parchment liner (for easier cleanup)
No fancy tools required—just simple kitchen basics.
👩🍳 Step-by-Step Instructions
Step 1: Prepare the bread
Take your bread slices and lightly butter one side of each slice.
💡 Tip: Buttered side = crispy golden crust after air frying.
Step 2: Build the sandwich
On the unbuttered side, layer:
- Cheese slice
- Ham slices
- Optional mustard or mayo
- Another cheese slice
Close with second bread slice (buttered side facing out).
🚫 Don’t overload fillings or it may not crisp evenly.
Step 3: Preheat air fryer
Set air fryer to 180°C (350°F) and preheat for 2–3 minutes.
Step 4: Air fry the sandwich
Place sandwich in basket.
Cook for 6–8 minutes total, flipping halfway through.
Look for:
- Golden brown bread
- Cheese fully melted
- Slight crisp edges
🔥 Aroma cue: buttery toast smell means it’s almost done.
Step 5: Rest and slice
Remove carefully and let it rest for 1–2 minutes.
Slice diagonally for that café-style look.
👨🍳 Chef-Level Tips & Mistakes to Avoid
- Always butter the outside for crispiness
- Don’t overstuff the sandwich
- Use pre-cooked ham only
- Flip halfway for even browning
- Let it rest before cutting to avoid cheese spill
💡 Pro Hack: Add a slice of cheese on both sides of ham for extra gooey melt.
🚫 Common mistake: Too much filling → bread won’t crisp properly.
🌶️ Variations & Customizations
🌶️ Spicy version
Add jalapeños, chili flakes, or spicy mustard.
🧀 Extra cheesy version
Use mozzarella + cheddar combo for stretchy melt.
🥗 Healthy version
Use whole grain bread + lean turkey + low-fat cheese.
🍳 Breakfast version
Add a fried egg inside for extra protein.
🧄 Garlic butter version
Mix garlic into butter before spreading.
🍕 Pizza-style twist
Add pizza sauce + oregano for Italian flavor.
🧊 Storage & Reheating Guide
Refrigerator:
Store wrapped for up to 24 hours
Freezer:
Not ideal (bread becomes soggy after thawing)
Reheating:
- Air fryer: 160°C for 3–4 minutes (best option)
- Toaster oven: 5 minutes
- Microwave: 30 seconds (soft, not crispy)
💡 Tip: Always reheat in air fryer for best crunch.
🍽️ Serving Suggestions
This sandwich works beautifully as a quick meal or snack.
Best pairings:
- French fries
- Salad
- Tomato soup
- Coleslaw
Drinks:
- Cold coffee
- Iced tea
- Lemon soda
- Milkshake
Garnishing ideas:
- Fresh parsley sprinkle
- Extra melted cheese drizzle
- Side ketchup or mustard dip
Plating tip:
Serve with fries in a basket-style plate for a café feel.
❓ FAQs
1. Can I make this without an air fryer?
Yes, use a pan or sandwich press, but air fryer gives better crispiness.
2. What cheese melts best?
Cheddar and mozzarella are the best for gooey texture.
3. Can I use raw ham?
No, always use cooked or ready-to-eat ham.
4. Why is my sandwich soggy?
Too much filling or not enough butter on the outside.
5. Can I make it vegetarian?
Yes, replace ham with grilled veggies or plant-based slices.
6. Do I need to flip it?
Yes, flipping ensures even golden crisp texture.
This Air Fryer Ham and Cheese Sandwich is proof that simple food can still feel incredibly satisfying. It’s crispy, melty, buttery, and ready in minutes—perfect for those moments when you want something comforting without effort.
Whether you’re making it for a quick lunch, a snack break, or a late-night craving, this sandwich never disappoints.
Try it once, and it might just become your go-to comfort fix.
If you make it, share how you customized it and don’t forget to tell someone who needs a quick, delicious meal idea.
Happy cooking—and even happier biting into that golden, cheesy crunch.